
Windows kernel driver static reverse using IDA and GHIDRA
Here are some notes for Windows drivers reverse enginering noob. This topic is already covered and you can find many resources on Internet, here we will use IDA and GHIDRA and observe differences.
Intro
In previous blogposts we did an overview of technical knowledges that won’t be covered here (IOCTL, symlink, etc). If we want to talk with a kernel drivers, we need to know at least :
- the symlink
- the IOCTL numbers
- buffer constraints (ex : size)
As an example we will open the famous DBUtils_2_3.sys vulnerable driver with IDA and GHIDRA.
STEP 0 - identify the entry point and the symlink
The first step is to identify the driver entry function.
- in IDA, it’s named start in the Function View We can skip this function and directly go to the to the “main”, for example following th jmp sub_11008 :
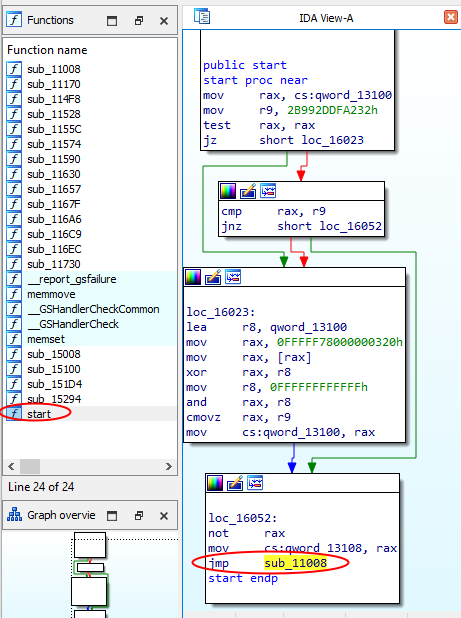
Then we land in the following function, where we get the target symbolic link which will be used by the user-mode client to talk with the driver :
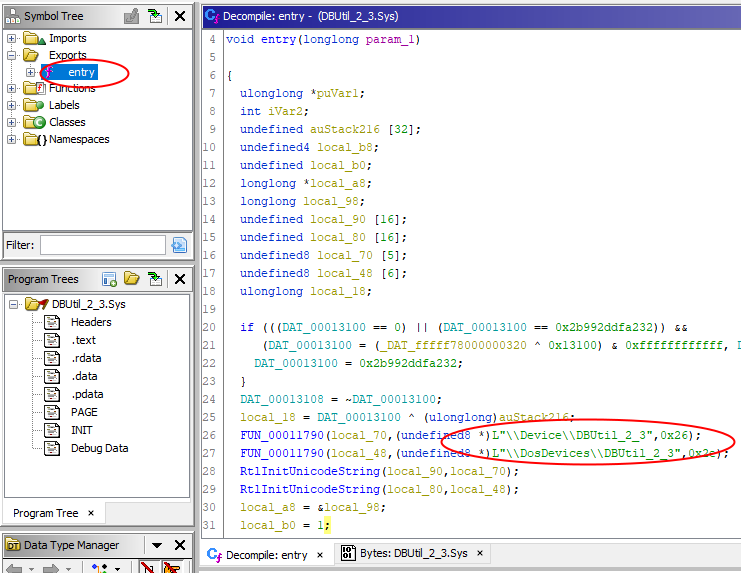
- in GHIDRA, it’s named entry in the Symbol Tree View, we directly get the target symbolic link which will be used by the user-mode client to talk with the driver :
Now we know how to talk to the driver : open an handle to the device, using the symlink we found (ex : \\.\DBUtil_2_3).
STEP 1 - identify the dispatch DeviceControl
Ok, we found the driver entry point, where can we go now ?
In order to keep in mind how this driver entry point is implemented by a developper, here is a source code example :
//
// Driver entry point
//
NTSTATUS DriverEntry(_In_ PDRIVER_OBJECT DriverObject){
  // Set up internal device name + symlink
  UNICODE_STRING mydevName = RTL_CONSTANT_STRING(L"\\Device\\DBUtil_2_3");
  UNICODE_STRING mysymLink = RTL_CONSTANT_STRING(L"\\??\\DBUtil_2_3"); // <--------- here is the interesting stuff for us

  // Set up the dispatch routine
  DriverObject->MajorFunction[IRP_MJ_CREATE] = DispatchCreate;
  DriverObject->MajorFunction[IRP_MJ_CLOSE] = DispatchClose;
  DriverObject->MajorFunction[IRP_MJ_DEVICE_CONTROL] = myDispatchDeviceControl;                   // <--------- here is the interesting stuff for us

  // Create the device object so that the client can reach the driver and open handles
  status = IoCreateDevice(DriverObject,0,&mydevName,FILE_DEVICE_UNKNOWN,0,FALSE,&DeviceObject);

  // make it accessible to user mode callers by providing symbolic link
  status = IoCreateSymbolicLink(&mysymLink, &mydevName);
}
When a driver receive an IRP from userland, it looks at the IOCTL number sent by the user-mode client in order to know what action need to be performed : it’s the purpose of the myDispatchDeviceControl routine so we want to find it (ex : for bug hunting purpose). The source code above highlight that myDispatchDeviceControl is probably located near IoCreateDevice (or IoCreateSymbolicLink) because once loaded into the kernel, a driver setup the dispatch routine and make it reachable using those two Windows APIs.
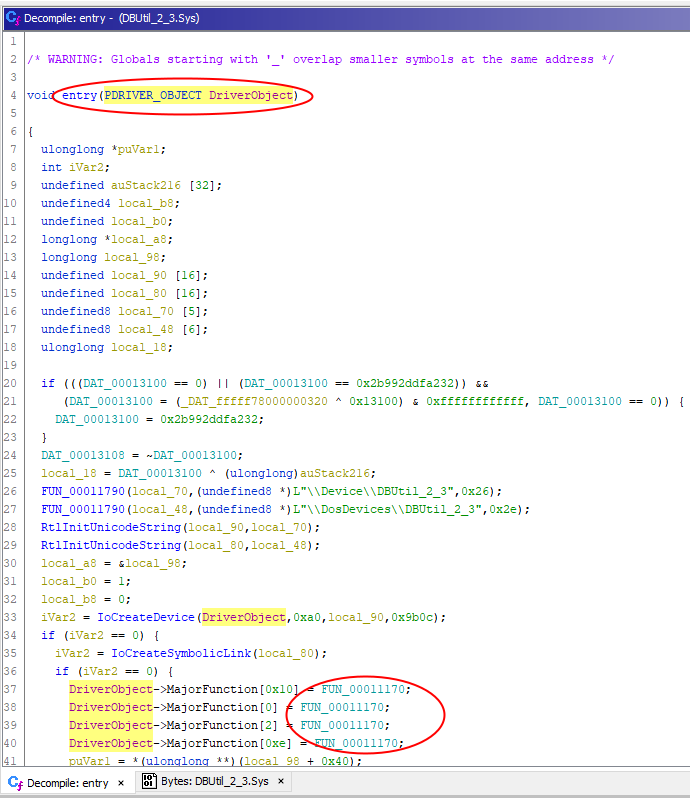
In summary : the above DriverObject can be identified as the first parameter of the “DriverEntry” function found in step 0.
In IDA :
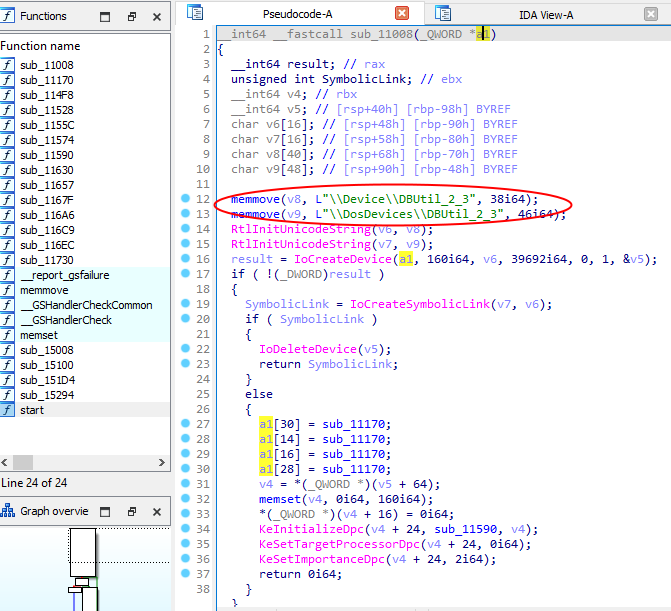
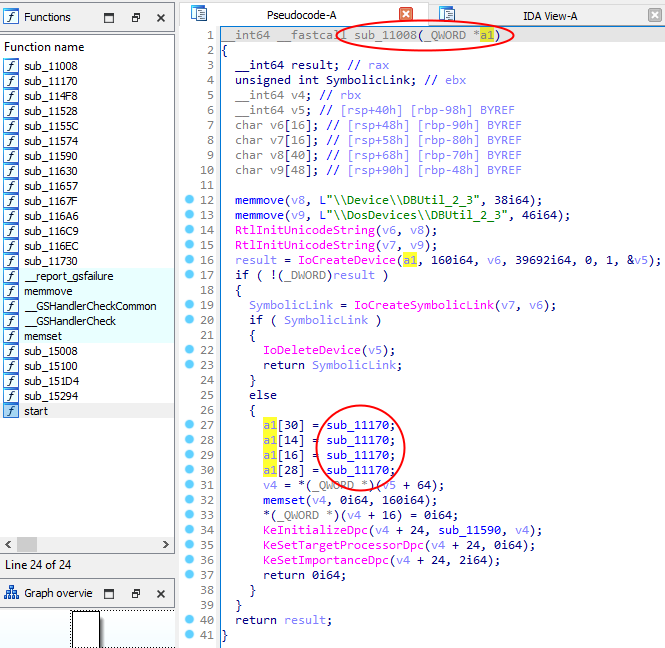
- the DriverEntry(
DriverObject) equivalent is sub_11008(a1) - the myDispatchDeviceControl equivalent is sub_11170 :
In GHIDRA :
- the DriverEntry(
DriverObject) equivalent is entry(param_1) - the myDispatchDeviceControl equivalent is FUN_00011170
- we can also add the real data type of
DriverObject:
| without data type | with correct data type |
|---|---|
 |
 |
STEP 2 - identify the data sent by the user-mode client
Ok, we found the myDispatchDeviceControl function, where can we go now ? Data sent by a user-mode client is located in IO_STACK_LOCATION (more details in the previous blogpost).
In order to keep in mind how this function is implemented by a developper, here is a source code example :
//
// Driver IOCTL processing function
//
NTSTATUS myDispatchDeviceControl(PDEVICE_OBJECT, PIRP currentIRP) {
  size_t szBufferIn, szBufferOut, ioctl_number;
  PVOID bufferIn, bufferOut;

  // get our IO_STACK_LOCATION
  IO_STACK_LOCATION * CurrentStackLocation = IoGetCurrentIrpStackLocation(currentIRP);

  // get values sent from user-mode client
  szBufferOut      = CurrentStackLocation->Parameters.DeviceIoControl.OutputBufferLength;
  szBufferIn       = CurrentStackLocation->Parameters.DeviceIoControl.InputBufferLength;
  ioctl_number     = CurrentStackLocation->Parameters.DeviceIoControl.IoControlCode;
  bufferIn         = CurrentStackLocation->Parameters.DeviceIoControl.Type3InputBuffer;

  //output buffer
  bufferOut = currentIRP->UserBuffer;
}
When a myDispatchDeviceControl routine receive an IRP from userland, it first uses IoGetCurrentIrpStackLocation for retrieving the IO_STACK_LOCATION structure :
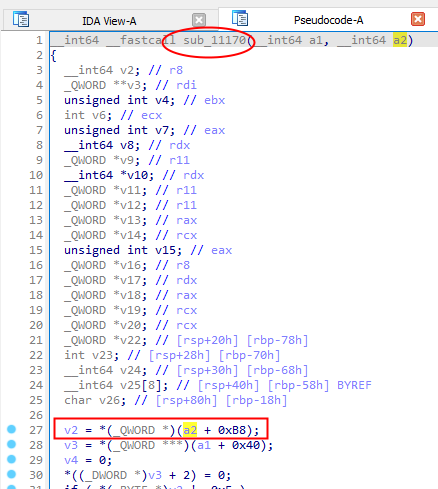
The IoGetCurrentIrpStackLocation operation should be the beginning of the function and because this API is just a kind of wrapper (thanks ReactOS doc) which returns a pointer on CurrentStackLocation structure, it appears as an IRP offset like :
CurrentStackLocation = currentIRP + 0xB8.
In IDA :
- the currentIRP equivalent is a2
- the CurrentStackLocation equivalent is v2
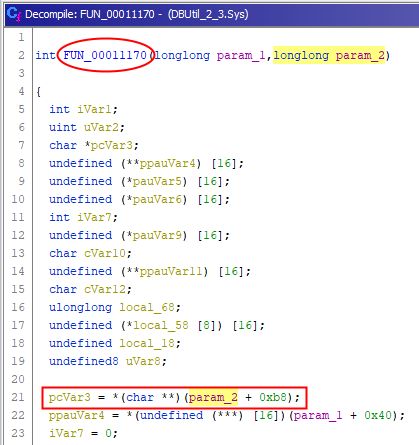
In GHIDRA :
- the currentIRP equivalent is param_2
- the CurrentStackLocation equivalent is pcVar3
- we can also add the real data type of
currentIRP:
| without data type | with correct data type |
|---|---|
 |
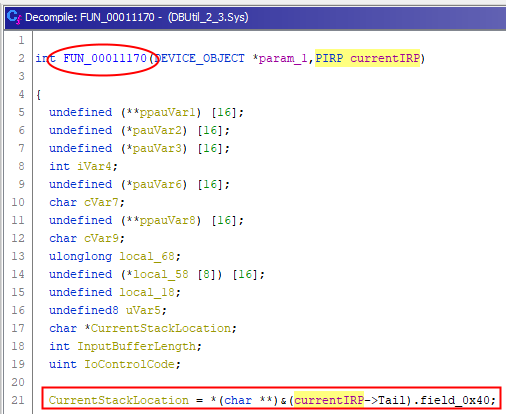 |
Using data type shows CurrentStackLocation is at (currentIRP->Tail)+0x40. We can confirm using Windbg :
3: kd> dt nt!_IRP Tail.Overlay.*
   +0x078 Tail          :
      +0x000 Overlay       :
         +0x000 DeviceQueueEntry : _KDEVICE_QUEUE_ENTRY
         +0x000 DriverContext : [4] Ptr64 Void
         +0x020 Thread        : Ptr64 _ETHREAD
         +0x028 AuxiliaryBuffer : Ptr64 Char
         +0x030 ListEntry     : _LIST_ENTRY
         +0x040 CurrentStackLocation : Ptr64 _IO_STACK_LOCATION
         +0x040 PacketType    : Uint4B
         +0x048 OriginalFileObject : Ptr64 _FILE_OBJECT
         +0x050 IrpExtension  : Ptr64 Void
Ok thanks, we confirm CurrentStackLocation is at IRP + 0xB8 (0x078 + 0x040).
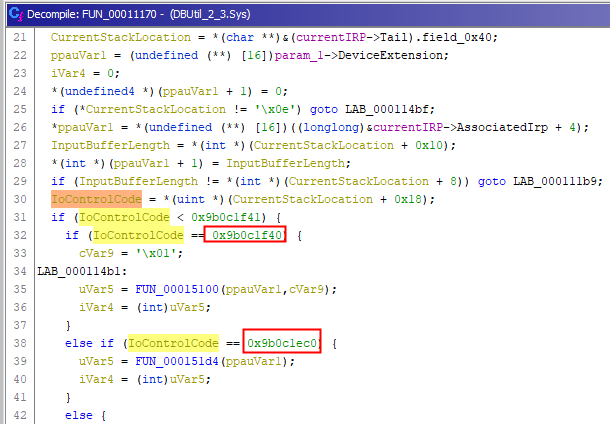
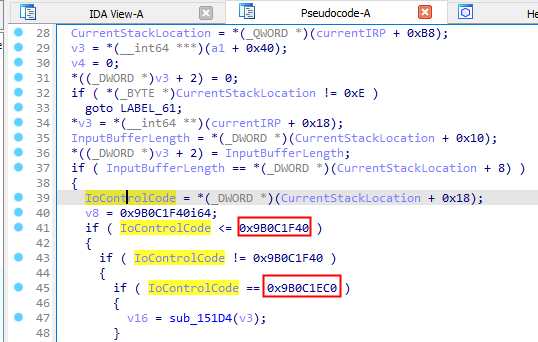
STEP 3 - identify valid IOCTL numbers
Ok, we identified CurrentStackLocation but what are the valid IOCTL numbers ? There are many if / else statements, which probably represents the IOCTL number processing done by the driver. Let’s confirm this point !
| GHIDRA | IDA |
|---|---|
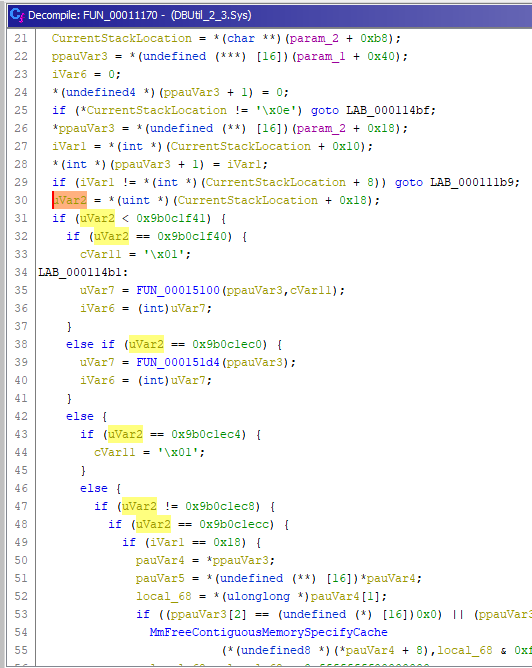 |
 |
Hey Windbg, what is the field at CurrentStackLocation + 0x18 ?
3: kd> dt nt!_IO_STACK_LOCATION Parameters.DeviceIoControl.*
   +0x008 Parameters                  :
      +0x000 DeviceIoControl             :
         +0x000 OutputBufferLength          : Uint4B
         +0x008 InputBufferLength           : Uint4B
         +0x010 IoControlCode               : Uint4B
         +0x018 Type3InputBuffer            : Ptr64 Void
Ok thanks, we confirm IoControlCode is at CurrentStackLocation + 0x008 + 0x010.
We can deduce the following offsets for other interesting fields :
OutputBufferLength = CurrentStackLocation + 0x8InputBufferLength = CurrentStackLocation + 0x10IoControlCode = CurrentStackLocation + 0x18Type3InputBuffer = CurrentStackLocation + 0x20
In the previous step we saw how to hunt DeviceControl function : it contains a (big) switch / case (or many if / else statements) operating on the IOCTL number.
We identified IoControlCode so we are able to list all valid values :
- 0x9b0c1f40
- 0x9b0c1ec0
- etc.
| GHIDRA | IDA |
|---|---|
 |
 |
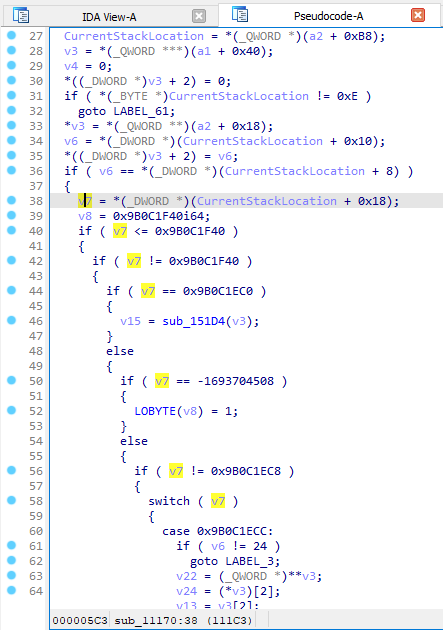
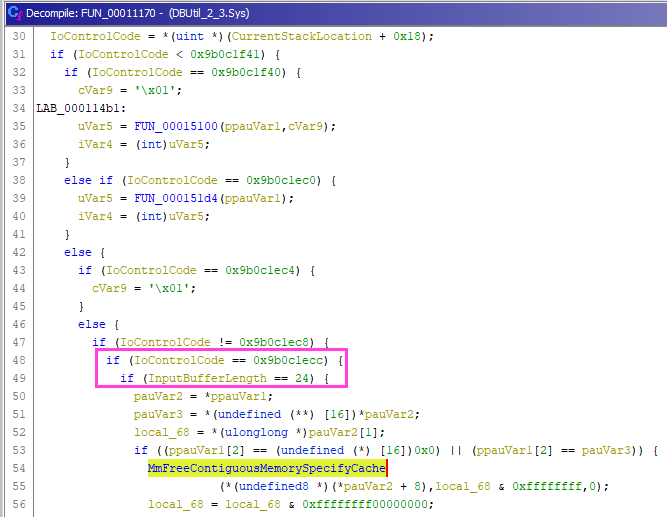
CONCLUSION
Now we have more clear view of what’s happening when sending data to the driver. The static analysis give us the ability to speed up the process of dynamic analysis because we know where data sent by a user-mode client will be processed. Thanks to these basics steps we are also able to know if a specific constraint applies.
For example : how can I send data to this driver and try to reach the MmFreeContiguousMemorySpecifyCache API below ?
| GHIDRA | IDA |
|---|---|
 |
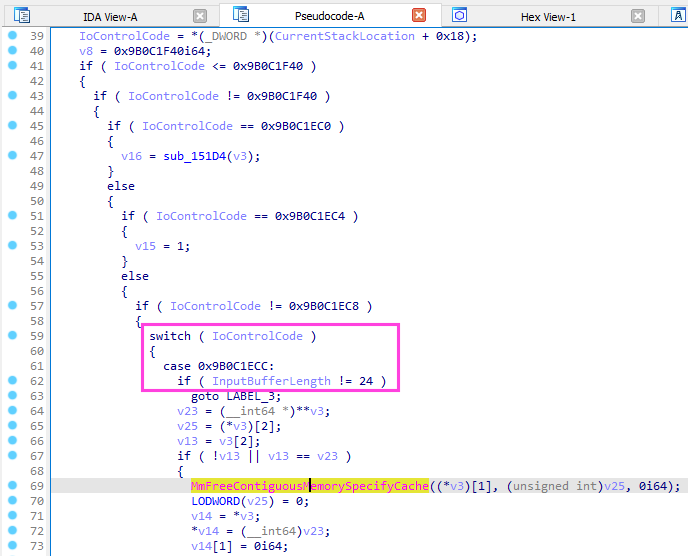 |
Yes you got it :
- interact with the driver by using the symlink named
\\\\.\\DBUtil_2_3 - use the IOCTL number
0x9B0C1ECC - send a buffer with a size of
24 bytes
Thanks for reading, feel free to send me feedbacks !
RESOURCES
https://posts.specterops.io/methodology-for-static-reverse-engineering-of-windows-kernel-drivers-3115b2efed83
https://voidsec.com/windows-drivers-reverse-engineering-methodology/
https://www.sentinelone.com/labs/cve-2021-21551-hundreds-of-millions-of-dell-computers-at-risk-due-to-multiple-bios-driver-privilege-escalation-flaws/