
Pimp my PID - get SYSTEM using Windows kernel
During my journey into the Windows Kernel I found interesting to create a tool to elevate any process to SYSTEM using a driver. Here are some details about that.
Intro
Disclaimer : this article does not show new concepts or techniques, but how to weaponize a driver
While I was starting an original challenge on root-me.org, I confirmed that my Windows Kernel knowledge was not enough to give me a chance to succeed. So I decided to dig into this subject by starting HackSys Extreme Vulnerable Driver exploitation. I learnt many things from W10x64 kernel shellcoding to buffer overflow exploitation in a driver. I tried to note as much weblinks as possible in this article for webography purpose.
During this experience I also developped my own driver for testing purpose. Idea was the following : is it possible to modify a user process privilege (from userland) using Windows Kernel ? Of course you know it’s possible but how ? This is the subject of this article.
Communication flow : from User-land to Kernel-land
High-Level overview
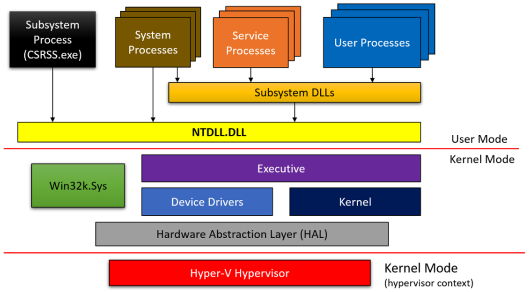
I bought the Pavel Yosifovich’s book named Windows Kernel Programming which was the best place to start with (for a n00b like me), I highly recommend it ! He starts the book giving an awesome figures which provide a good overview of the frontier between user and kernel lands when you use a Windows API functions in your program. In the following chapters we will focus on the interactions between User Processes and the Device Drivers.
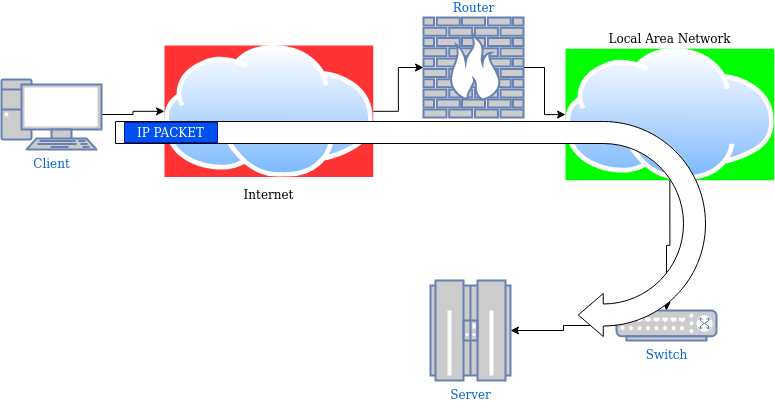
I try to keep it as simple as possible in my mind and because I’m familiar with routing/switching IP packets, I did an analogy between the client/driver communication and the client/server model from Internet Protocol Suite.
Here is a simple network diagram showing how an IP packet is processed during its travel over the network, and the equivalent with an IRP traveling the operating system.
The IRP is “routed” to the kernel by the I/O System Services, then the I/O Manager deliver it to the driver for the information to be processed.

Windows I/O Model : main concepts
The first schema I keep in mind is the figure below, showing the device object model. We can retain those concepts :
- The I/O requests are sent from userland to the driver using IRP.
- The I/O manager presents a consistent interface to all kernel-mode drivers.
- This I/O manager creates a driver object for each driver that has been installed and loaded.
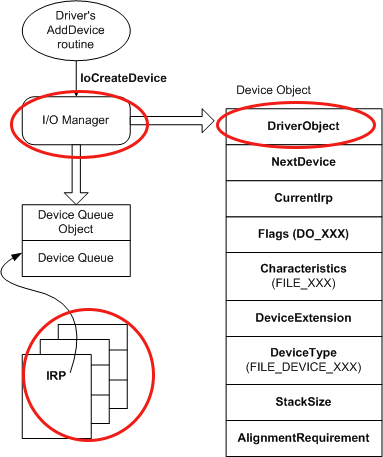
The DRIVER_OBJECT contains storage for entry points to many of a driver’s standard routines. It’ also important to note that point : when the I/O manager processes an IRP, it supplies the current driver’s DRIVER_OBJECT memory address to the main function called DriverEntry.
You can find here more details on how IRP are processed within the kernel.
Kernel world : driver structures and components
Oh wait ! We have a nice overview of how the information goes from the user to the driver but we have to dig into the “payload” format. When entering the Windows drivers “realm”, you can’t overlook some important kernel structures.
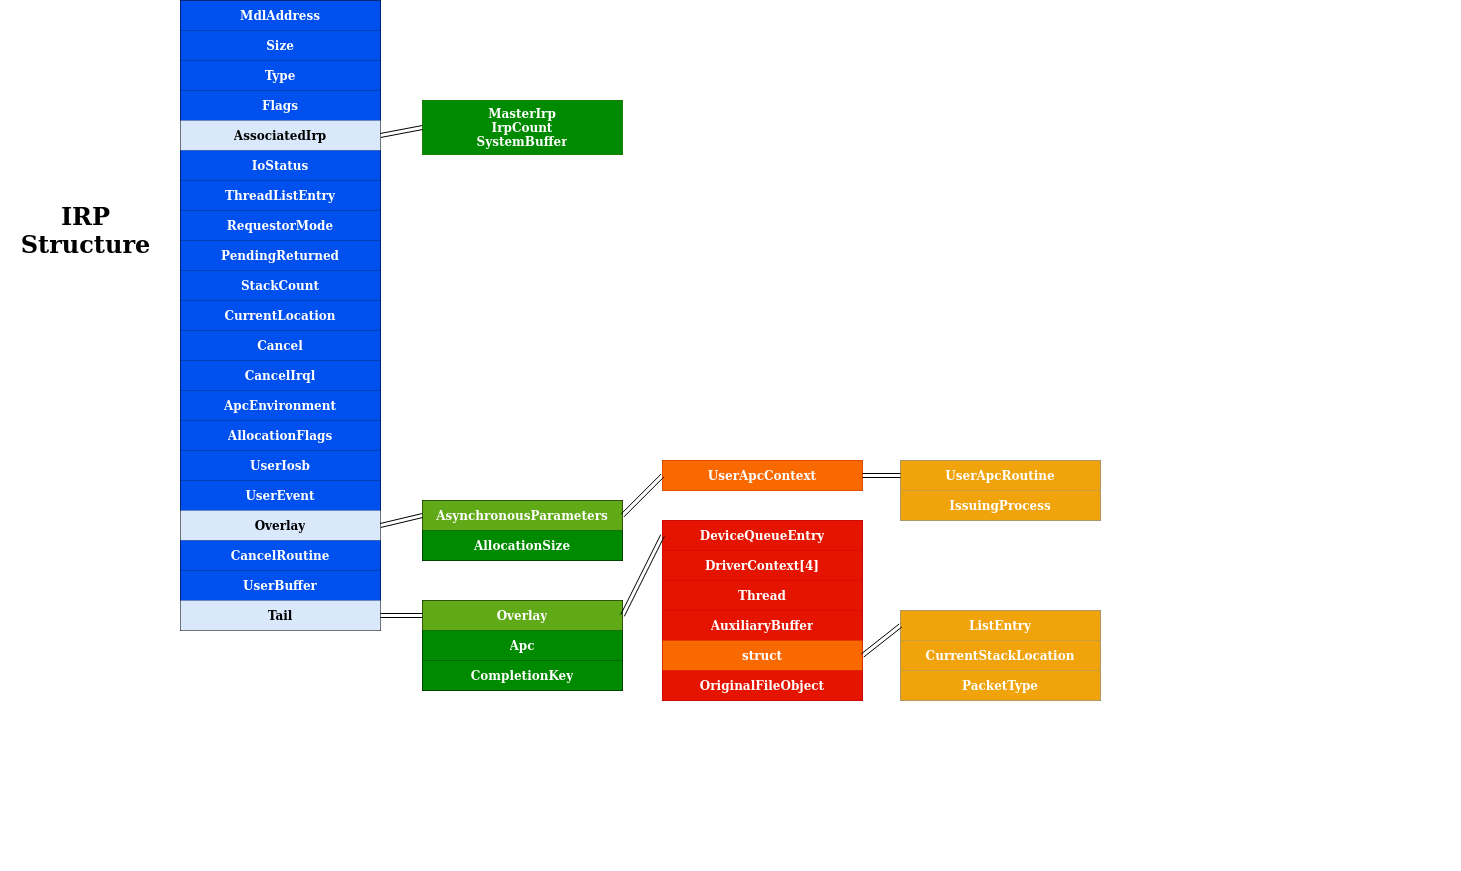
IRP structure
We are talking about IRP, but what is this ? It stands for Input/Output Request Packet : the data provided by the user is wrapped into it. The IRP structure is a standard NT structure defined in WDM.H. It is composed with many fields and sub-structures, but in this article we will focus on the following elements :
- the UserBuffer field : actually this is where the data returned from the driver will be transmitted to the client (Note : in our example we will use the TransfertType named
METHOD_NEITHER, so the output buffer’s address is stored here) - the CurrentStackLocation field : actually this is where the data sent from the client will be reached by the driver.
IO_STACK_LOCATION structure
We can observe in the previous figure the CurrentStackLocation area : it’s a pointer to an IO_STACK_LOCATION structure also defined in WDM.H. Here are some key points about this nested structure :
- the MajorFunction field : it’s the type of I/O operation to be performed. In our future example, we will use
DeviceIoControlAPI which reaches the driver by invoking the IRP_MJ_DEVICE_CONTROL major function. - the Parameters field : the light green color indicates all usable “Parameters”, which are actually Windows API functions. Those functions help to retrieve the user / data input buffer. Each parameter field is a structure but I choose to not overload the figure by only detailing the function we will use later :
Parameters.DeviceIoControl.Type3InputBuffer.
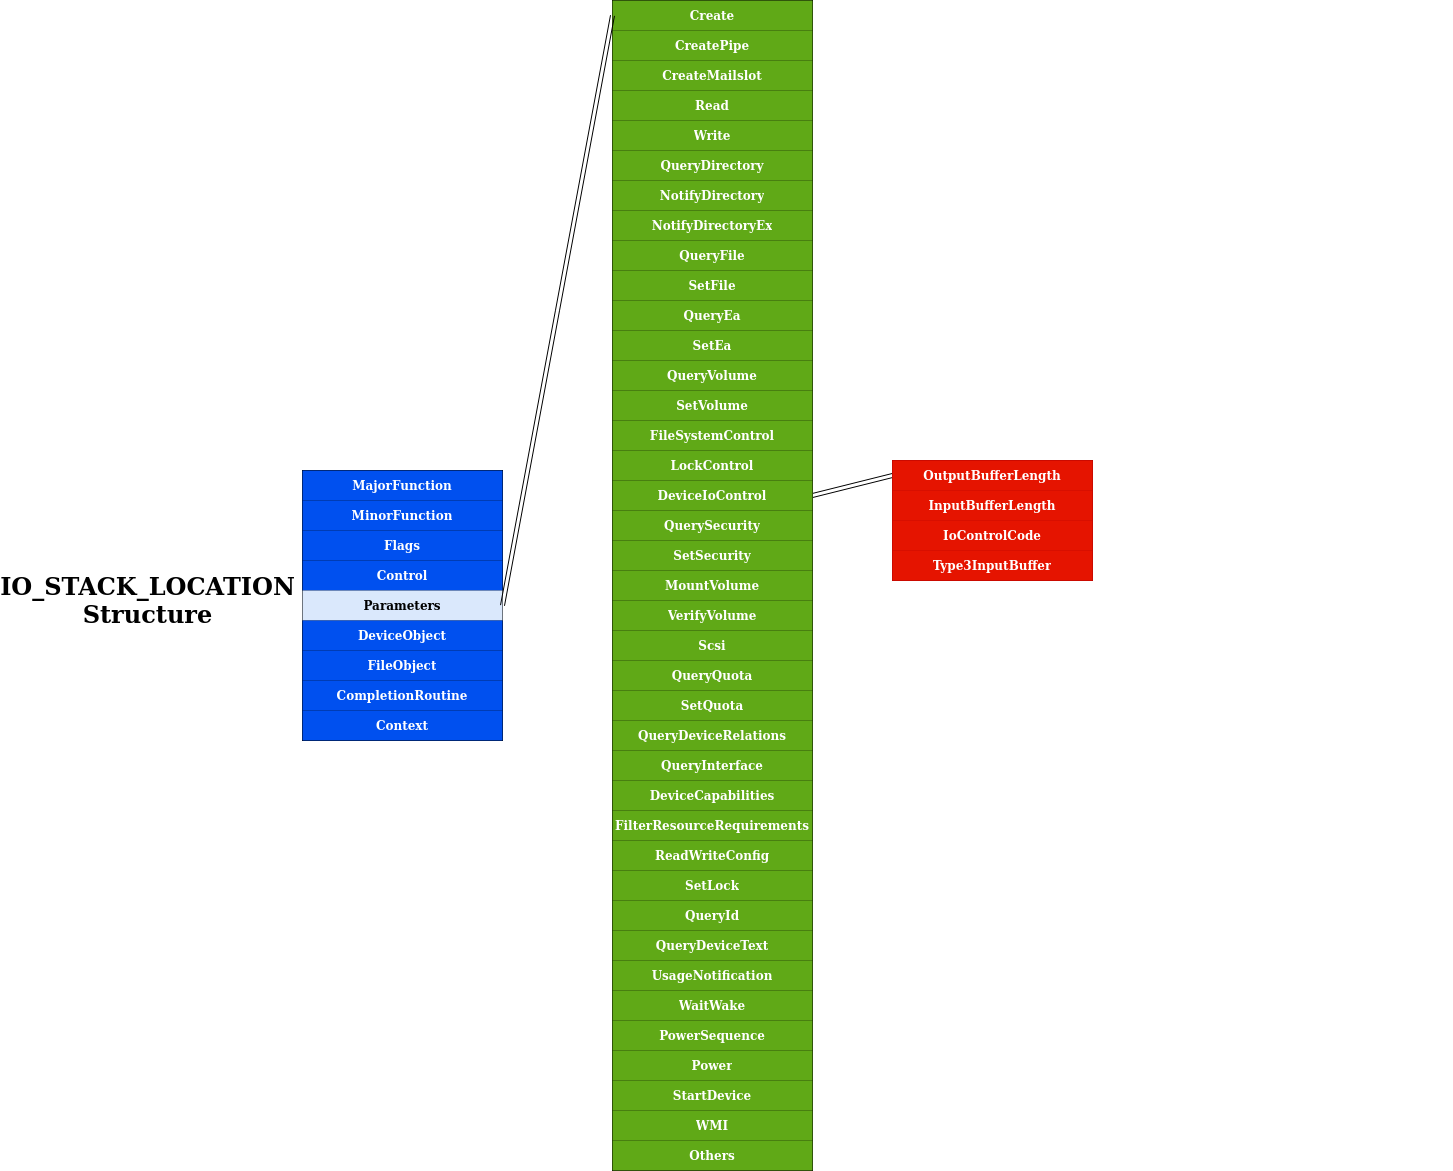
You also noticed the DeviceObject field which appears here, lets have look at this structure with more details in the next paragraph.
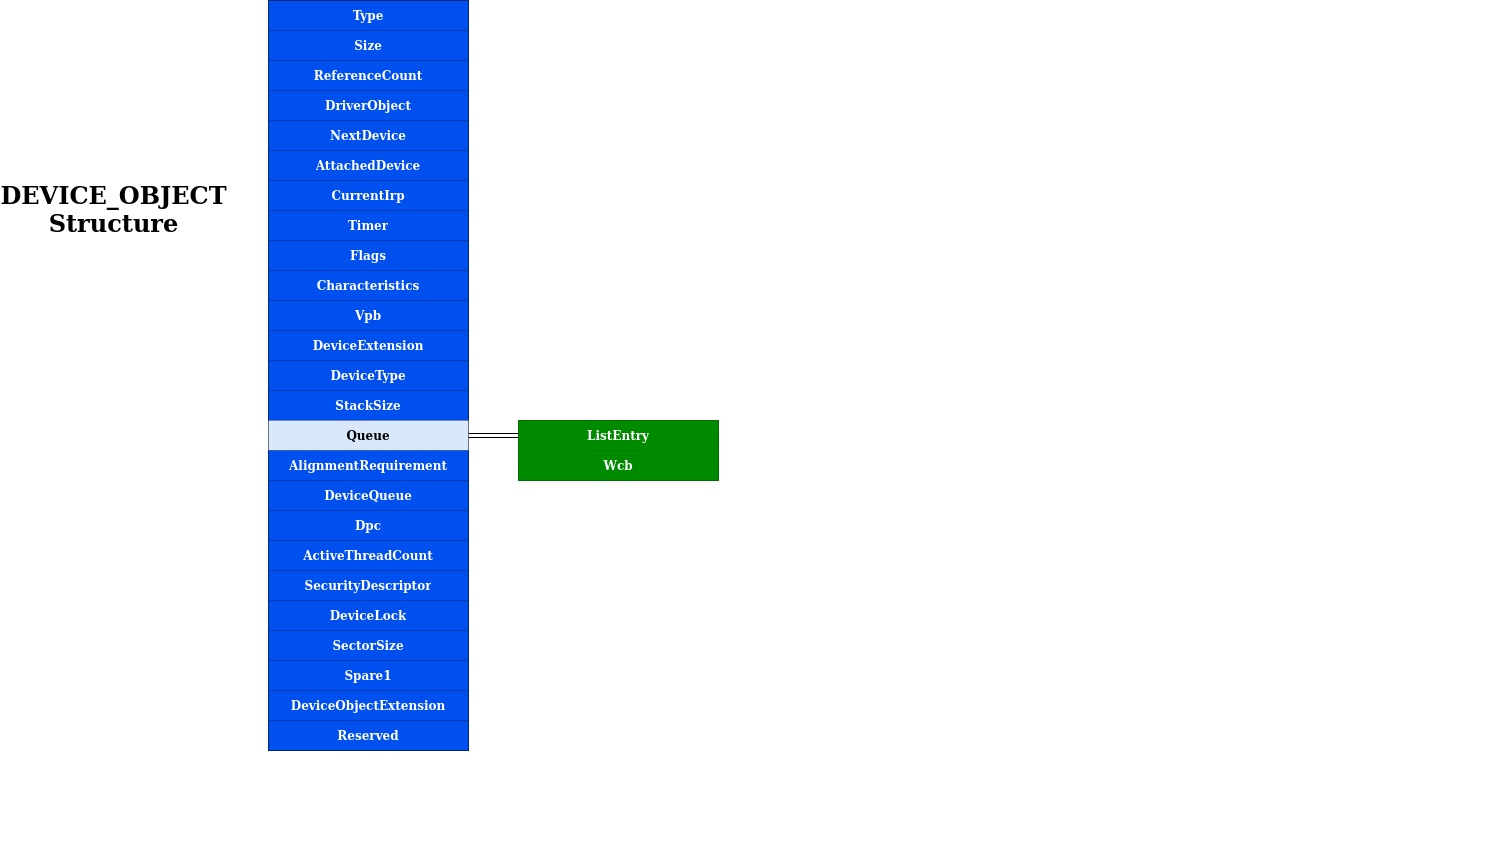
DEVICE_OBJECT structure
A device object represents a logical, virtual, or physical device for which a driver handles I/O requests. The interesting parts are :
- the DeviceType : identifies a type of device. This information is important when generating the IOCTL control code
- the DriverObject : a pointer to the DRIVER_OBJECT, that represents the loaded image of the driver that was input to the
DriverEntryroutine. This member is set by the I/O manager upon a successful call to theIoCreateDeviceAPI.
DRIVER_OBJECT structure
Eventually we can link the above structures together : the DRIVER_OBJECT structures (also defined in WDM.H) describes important information about the driver itself :
- the DeviceObject is a DEVICE_OBJECT created by the
IoCreateDeviceroutine - the DriverStart field contains the driver memory location in the kernel
- the DriverName is the name which can be used to reach the driver
- the MajorFunction is a dispatch table, consisting of an array of entry points for the driver’s DispatchXxx routines
This last point is important : each driver contains major function codes which tells the driver what operation it should carry out to satisfy the I/O request. All drivers must support at least :
- IRP_MJ_CREATE
- IRP_MJ_CLOSE
- IRP_MJ_DEVICE_CONTROL

Extra mile
As it’s quite complex domain (from my point of view), summarizing the Windows kernel driver way of working is hard and doing this exercise implies to lose some accuracy. But when needed I refer to the Pavel’s book and also those great articles :
- Kernel/Windows Driver Model (Windows Hardware Developper Documentation)
- Understanding the Windows I/O System (Mark E. Russinovich, Kate Chase and Alex Ionescu)
Enough theory : practical example
Okay ! We ended with the boring part :-) Now it’s time to implement, let’s open the coding part which is more fun. Putting all this structures and concepts together and we will have a nice example.
The core functionalities will be placed in the vikingdrv2DeviceControl routine which take two arguments :
- a pointer to a DEVICE_OBJECT
- a pointer to an IRP
We first store the IO_STACK_LOCATION pointer into the stack variable. Thanks to this variable the we can retrieve information sent by the client :
- we start by verifying the IOCTL number
- if the IOCTL is a known value we continue
- eventually we store the payload in the
datavariable
	NTSTATUS vikingdrv2DeviceControl(PDEVICE_OBJECT, PIRP Irp) {
		auto stack = IoGetCurrentIrpStackLocation(Irp);
		switch (stack->Parameters.DeviceIoControl.IoControlCode) {
			case IOCTL_number1: {
				auto data = (ThreadData*)stack->Parameters.DeviceIoControl.Type3InputBuffer;
			}
			...
		}
	}
Then we define the main function, named DriverEntry. As said before, this function take a pointer to DRIVER_OBJECT structure. In order to know which function must be executed when an IRP_MJ code is provided, the driver must define a dispatch routine. The most important here is to make it able to process the IRP_MJ_DEVICE_CONTROL message : the vikingdrv2DeviceControl function will be called for that purpose.
	NTSTATUS DriverEntry(_In_ PDRIVER_OBJECT DriverObject, _In_ PUNICODE_STRING RegistryPath) {
		// [snip]
		// Set up the dispatch routine
		DriverObject->MajorFunction[IRP_MJ_CREATE] = vikingdrv2CreateClose;
		DriverObject->MajorFunction[IRP_MJ_CLOSE] = vikingdrv2CreateClose;
		DriverObject->MajorFunction[IRP_MJ_DEVICE_CONTROL] = vikingdrv2DeviceControl;
	}
What ? Is it so simple ? Yes, it’s basic but it works ;-)
First simple driver : PimpMyThread
We landed here with enough knowledge to start at coding a full driver. Using the Pavel’s book examples I had the opportunity to code a first driver which does the following :
- wait for an IRP
- display Windows Version Information when IRP has the good IOCTL structure
- change the priority of a given thread (<=> user process)
Kernel side : the driver code
Step 1 - preparing communication between the driver and the rest of the world
The driver client and the driver itself must have a ‘common’ speaking manner. The DeviceIoControl function sends a control code directly to a specified device driver, causing the corresponding device to perform the corresponding operation. There are three important pieces to this function : :
- A control code (in our case we choose IOCTL
0x800) - An input buffer containing our data (for our example
ThreadData) - An output buffer
	#define IOCTL_PRIORITY_BOOSTER_SET_PRIORITY CTL_CODE(VIKINGDRV2_DEVICE, \
	0x800, METHOD_NEITHER, FILE_ANY_ACCESS)

	struct ThreadData {
		ULONG ThreadId;
		int Priority;
	};
Step 2 - preparing the kernel driver to process the client requests
Having a basic working Windows driver implies a few things.
- Create an entry point : we will use the
DriverEntryfunction to process the receivedDriverObject.
DriverEntry(_In_ PDRIVER_OBJECT DriverObject, _In_ PUNICODE_STRING RegistryPath) {- Set up the dispatch routine to handle
IRP_MJ_DEVICE_CONTROL/ the driver object : we will name the functionvikingdrv2DeviceControl.
DriverObject->MajorFunction[IRP_MJ_DEVICE_CONTROL] = vikingdrv2DeviceControl;- Provide
device nameandsymlink name, then create the device object so that the client can reach the driver and open filesystem handles.
	UNICODE_STRING devName = RTL_CONSTANT_STRING(L"\\Device\\vikingdrv2"); // internal device name
	UNICODE_STRING symLink = RTL_CONSTANT_STRING(L"\\??\\vikingdrv2"); // symlink
	PDEVICE_OBJECT DeviceObject;
	NTSTATUS status = IoCreateDevice(
		DriverObject,		// our driver object,
		0,					// no need for extra bytes,
		& devName,			// the device name,
		FILE_DEVICE_UNKNOWN,	// device type,
		0,					// characteristics flags,
		FALSE,				// not exclusive,
		& DeviceObject		// the resulting pointer
	);
	if (!NT_SUCCESS(status)) {
		KdPrint(("Failed to create device object (0x%08X)\n", status));
		return status;
}- Now we have a pointer to our device object, make it reachable to user mode callers by providing symbolic link.
	status = IoCreateSymbolicLink(&symLink, &devName);
	if (!NT_SUCCESS(status)) {
		KdPrint(("Failed to create symbolic link (0x%08X)\n", status));
		IoDeleteDevice(DeviceObject);
		return status;
	}
Step 3 - driver core functionnality
Ok we prepared all the necessary to handle a request, now we can specify how to process this.
- First we have to locate our
stack location(from the driver point of view) and confirm that our client gives us an IOCTL we are able to handle
	NTSTATUS vikingdrv2DeviceControl(PDEVICE_OBJECT, PIRP Irp) {
	auto stack = IoGetCurrentIrpStackLocation(Irp); // IO_STACK_LOCATION*
  	switch (stack->Parameters.DeviceIoControl.IoControlCode) {
case IOCTL_PRIORITY_BOOSTER_SET_PRIORITY: {- Then we process the buffer to retrieve the
ThreadDatastructure prepared by the client
auto data = (ThreadData*)stack->Parameters.DeviceIoControl.Type3InputBuffer;- Eventually we process the
dataprovided by the client. Here we modify the thread priority of the process
	// function thats look up a thread by its ID. Turn our thread ID to a pointer
	PETHREAD Thread;
	status = PsLookupThreadByThreadId(ULongToHandle(data->ThreadId), &Thread);
	// set the new priority
	KeSetPriorityThread((PKTHREAD)Thread, data->Priority);
The full source code of this simple driver is available here :


Or you can download the whole Visual Studio project on github.
User side : the client code
In the kernel land, everything is allright : the driver is waiting for requests. What about the client code now ? It’s quite simple.
- First let’s create a main function which handle parameters supplied by the user.
	int main(int argc, const char* argv[]) {
		if (argc < 3) {
			printf("Usage: Booster <threadid> <priority>\n");
			return 0;
}- Then open an handle to the device, using the symlink.
	HANDLE hDevice = CreateFile(L"\\\\.\\vikingdrv2", GENERIC_WRITE,
		FILE_SHARE_WRITE, nullptr, OPEN_EXISTING, 0, nullptr);

	if (hDevice == INVALID_HANDLE_VALUE)
		return Error("Failed to open device");

	ThreadData data;
	data.ThreadId = atoi(argv[1]);	// command line first argument
data.Priority = atoi(argv[2]); // command line second argument- Now we’re ready to call DeviceIoControl and close the device handle afterwards.
	// DeviceIoControl reaches the driver by invoking the IRP_MJ_DEVICE_CONTROL major function
	DWORD returned;
	BOOL success = DeviceIoControl(hDevice,
		IOCTL_PRIORITY_BOOSTER_SET_PRIORITY,// control code
		&data, sizeof(data),				// input buffer and length
		nullptr, 0,							// output buffer and length
		&returned, nullptr);
	if (success)
		printf("Priority change succeeded!\n");
	else
		Error("Priority change failed!");

	CloseHandle(hDevice);
The full source code of this simple client is available here :

Or you can download the whole Visual Studio project on github.
Install, load and test the driver
Compiling this driver produces a file.sys which can be installed as a service :
sc create viking_drv2 type= kernel binpath= C:\viking_driver2.sysThen disable the signature verification, if the driver is signed then enable the test signing mode and disable integrity check.
	bcdedit -debug on
	bcdedit.exe -set TESTSIGNING ON
	bcdedit.exe /set nointegritychecks on
Actually reboot and start the service.
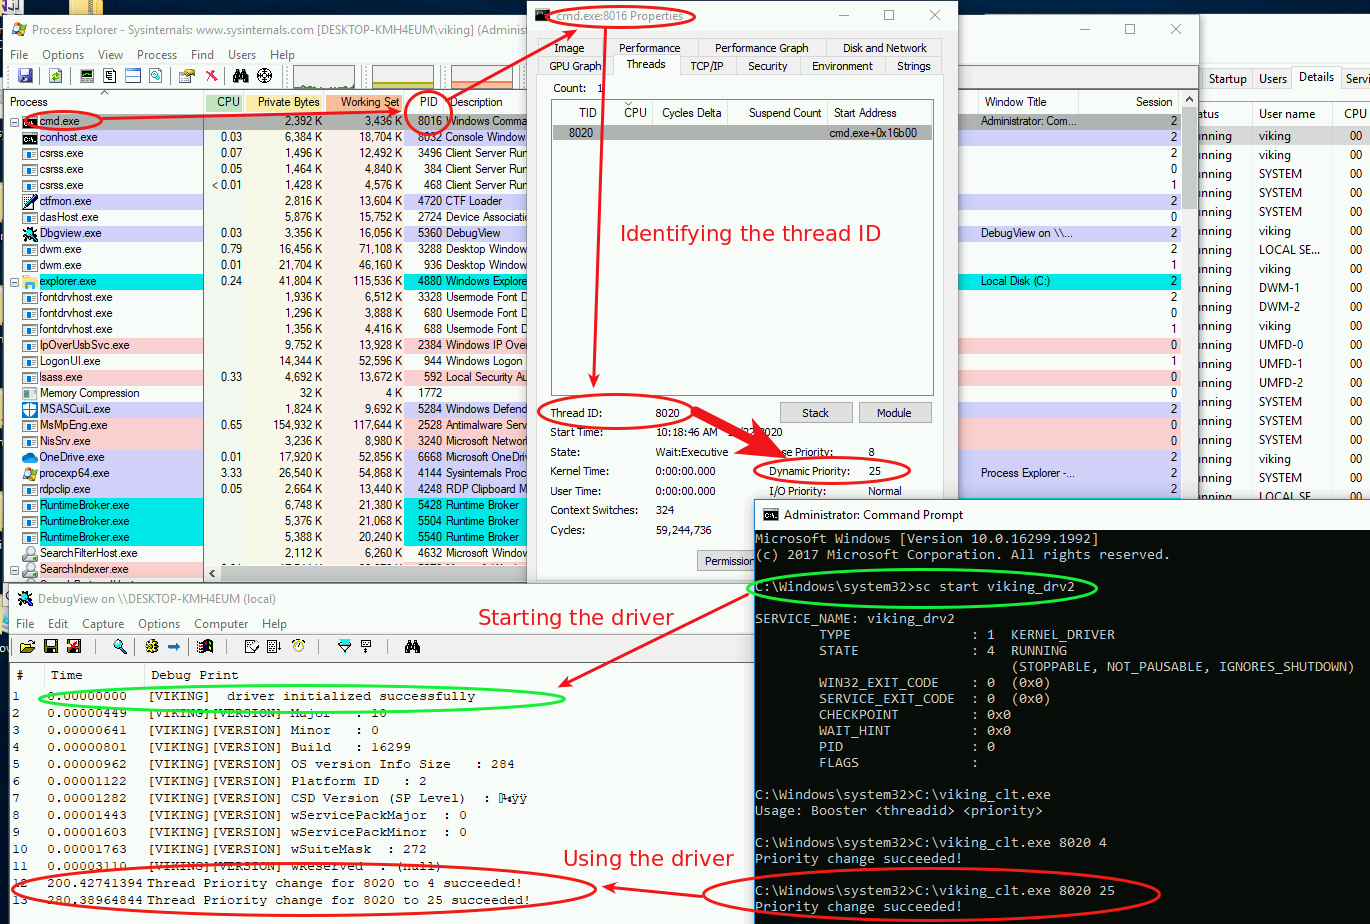
sc start viking_drv2For testing purpose, we can do the following :
- start Process Explorer
- start cmd.exe
- start the service / driver
- identify the thread ID
- use the driver client to modify the thread priority : from 8 to 25
And yes, that’s it ! Here is the result :
Playing with kernel powers : PimpMyPID
The example above comes from the Windows Kernel Programming book, so I had no doubt it would work successfully :-) But I want to modify a process token rather than its thread priority.
Token elevation is a well known subject and I applied the same methodology, using the kernel API.
Find the process memory area
When the driver receive the PID, the first thing we need is to find the process in the memory. Fortunatly an API can do the job for us, here is an example :
	PsLookupProcessByProcessId((HANDLE)*pid, &process);
	PsLookupProcessByProcessId((HANDLE)4, &system_process);
When the PsLookupProcessByProcessId API ends, the PEPROCESS structures named process and system_process are available and contains all the necessary to get information about the requested PID (and also the SYSTEM pid number 4)
Get the processes tokens
Hey, knowing the process location let us the opportunity to get the token value of this process. The Windows API can help again :
	targetToken = PsReferencePrimaryToken(process);
	systemToken = PsReferencePrimaryToken(system_process);
Elevate !
Since the 2012 Cesar Cerrudo BH talk, several options can be used to do the job. I noticed that many Windows kernel EoP exploits are using the same “find and replace” function, for example Skylake use this technique in the MS15-010 exploit. This function is portable so I decided to first use it and see later if manual shellcoding should be a better option.
I ended my PoC with the following function call :
FindAndReplaceMember((PDWORD_PTR)process, (DWORD_PTR)targetToken, (DWORD_PTR)systemToken, MaxExpectedEprocessSize);Powershell client
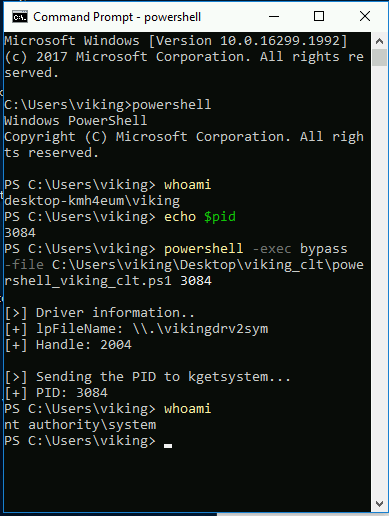
Did you know you can call driver functions using Powershell ? I was tired of re-compiling my client and I discovered awesome FuzzySec articles which use PSH, wonderful !
The concepts do not change :
- get the PID of the process
- specify the driver name to call
- open an handle to the device driver
- call deviceIOConttrol
	# step 1
	$myPID = [int]$args[0]
	# step 2
	$driverName =  "\\.\vikingdrv2sym"
	# step 3
	$hDevice = [KGETSYSTEMCLIENT]::CreateFile($driverName, [System.IO.FileAccess]::ReadWrite,
	[System.IO.FileShare]::ReadWrite, [System.IntPtr]::Zero, 0x3, 0x40000080, [System.IntPtr]::Zero)
	# last step
	[KGETSYSTEMCLIENT]::DeviceIoControl($hDevice, $IOCTL_DRV_QUERY_PROPERTY,
	[ref]$myPID, [System.Runtime.InteropServices.Marshal]::SizeOf($myPID), $null, 0, [ref]0, [System.IntPtr]::Zero)|Out-null
Please pimp my PID right now !
Did I take some screenshots about it ? Of course ahah :-) just give the PID to the powershell script to trigger the “PrivEsc” feature ;-)
I also found interesting to look at the debug messages using DebugView :
Outro
Well, I first named this project “kgetsystem” (for Kernel getsystem) but I found PimpMyPID to be a more funny name isn’t it ? I hope you enjoyed discovering Windows kernel drivers and feel free to give me some feedback, it would be appreciated.
Skol !