
How to get local root shell on the LG HR598 Bluray
For a long time I was wondering how to pwn embedded (or IoT) devices. I managed to get a root shell on my old LG HR 598 Bluray player, here is some notes about my hardware hacking journey.
Intro
I had no idea on where to start so I searched more information about hardware hacking and eventually watched some interesting tutorials from Make Me Hack.
From those videos I got a plan :
- Open the device & identifying components
- Find the UART or JTAG interface
- Get the firmware and root filesystem
Doing hardware hacking implies some physical material, I bought this :
- 1 FT232RL FTDI USB 3.3V 5.5V
- 1 Bus Pirate
Step 1 - Open the device & identifying components
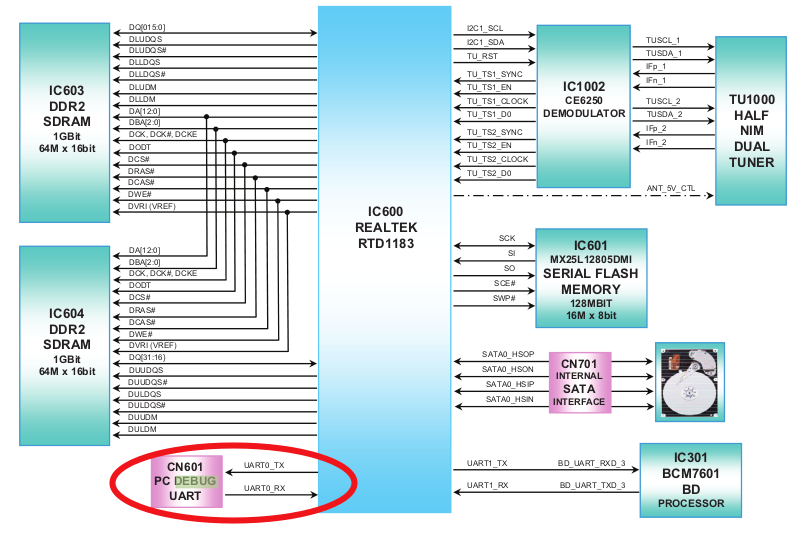
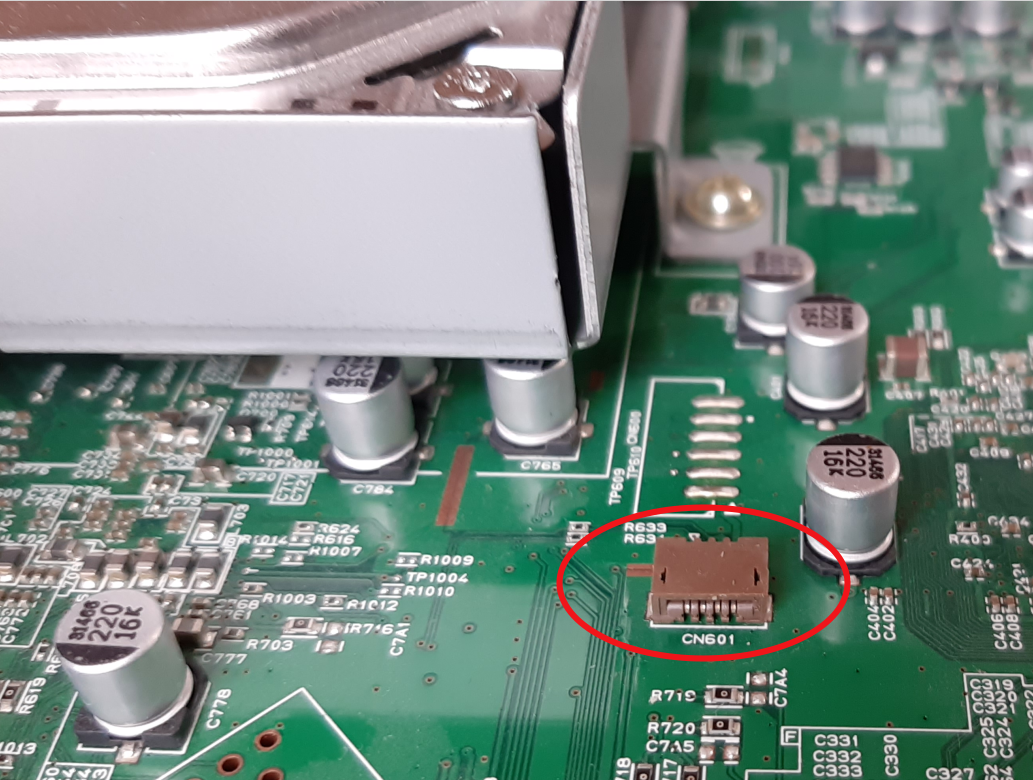
Ok opening the Bluray and looking at the board. We will focus on the center of the motherboard :
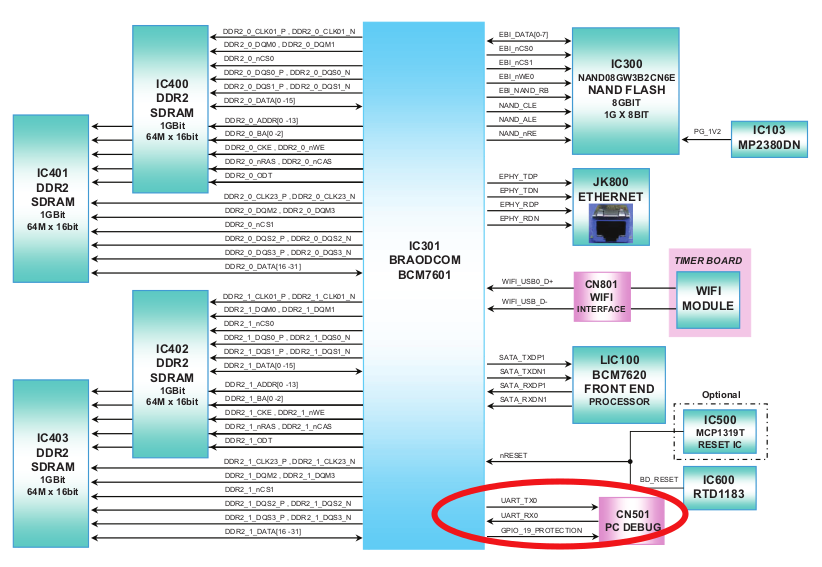
By looking more closely at the components we can identify some PIN connectors (red rectangle on the above figure) which seems to be an UART interface on the component CN501. We will identify each pin by numbers, from 1 to 6.
Step 2 - Find the UART or JTAG interface
First try
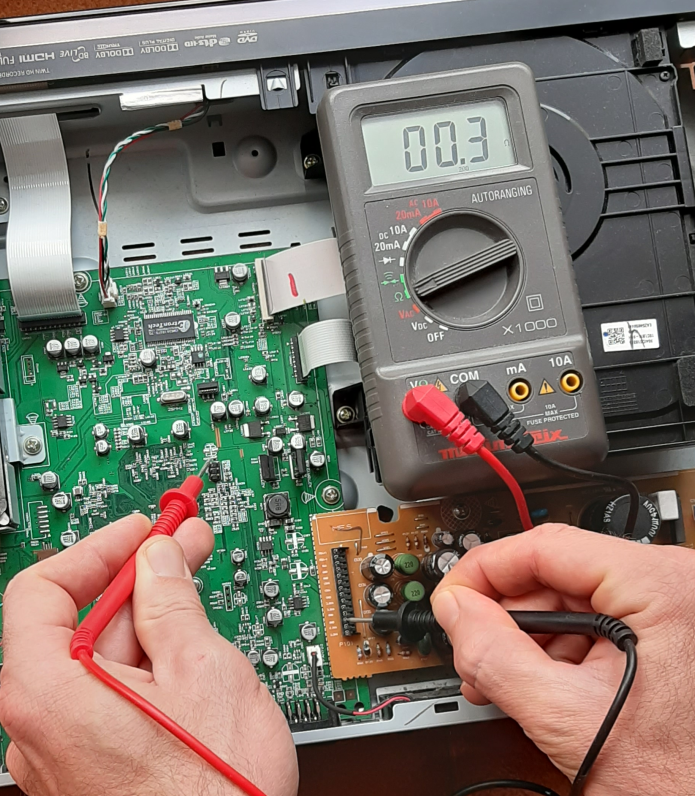
For each PIN we use a multimeter to start with resistance measurement (against ground), the figure below show PIN 3 measure.
We can gather information into this table :
| PIN Number | R gnd (Ohms) | Description |
|---|---|---|
| 1 | 10k | ? |
| 2 | Infinite | ? |
| 3 | 0 | Probably the Ground |
| 4 | 7.5k | ? |
| 5 | 47k | ? |
| 6 | 1.3k | ? |
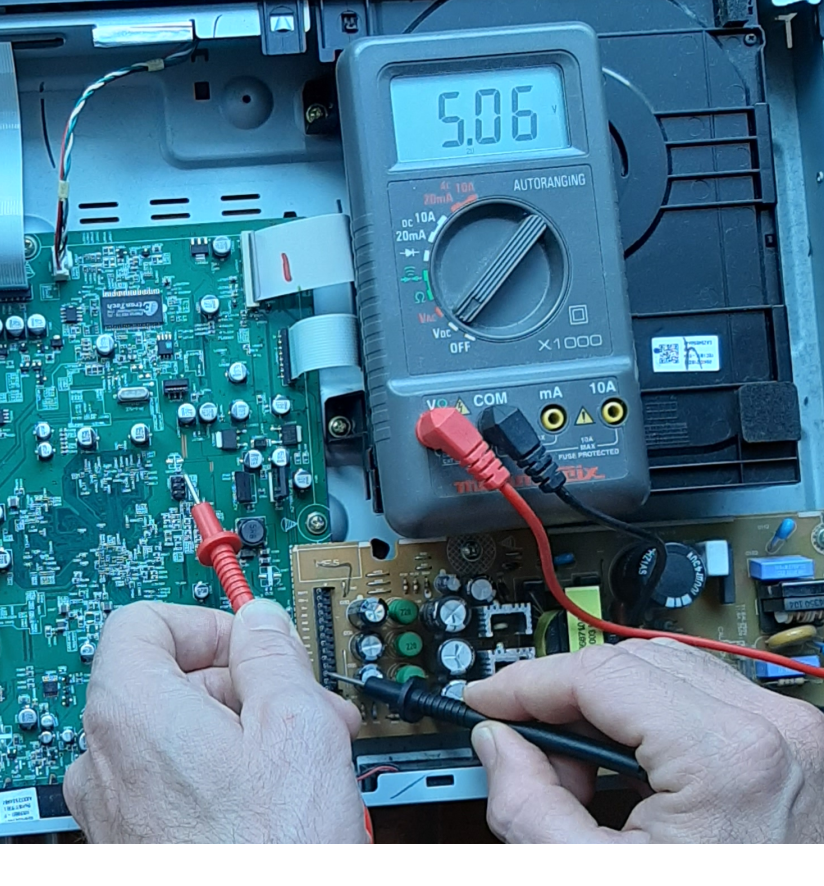
Now we can repeat measurement, but against Vcc. It will helps to know which voltage to configure on the FT232RL FTDI USB : 3.3V or 5.5V. Here is for example voltage measure of the PIN number 6.
Eventually we have needed information :
| PIN Number | R gnd (Ohm) | Voltage (Volt) | Description |
|---|---|---|---|
| 1 | 10k | 3.4 | ? TX or RX |
| 2 | Infinite | 3.7 | ? |
| 3 | 0 | 0 | Ground |
| 4 | 7.5k | 2.7 | ? TX or RX |
| 5 | 47k | 0 | ? |
| 6 | 1.3k | 5 | ? |
So we plug the FT232, configure Putty with the standards parameters (COM : 115200,n,8,1) and I had nothing on my screen :-(
Swaping TX and RX cables give some output !
BCM97601 B0-BSEC-21  CFE v2.1.21 (CFE core v2.1, BSP_REV 21), Endian Mode: Little
Build Date: Tue Dec  8 14:06:29 EST 2009 (christj@stb-mhtb-04)
Copyright (C) Broadcom Corporation.
BCM74430010
Setting NAND Params

CFE starting from ROM
SoooooooooooooR

Starting code in RAM

BCM74430010
Setting NAND Params
I try to send commands but my data doesn’t seems to be transmitted to the Bluray. I moved the Tx from PIN 4 to 5, and I observed more output :
BCM74430010
Setting NAND Params

CFE starting from ROM
SoooooooooooooR

Starting code in RAM
Booting Secured C
BCM74430010
Setting NAND Params

CFE starting from ROM
SoooooooooooooR

Starting code in RAM
Booting Secured CFE...


BCM97601 B0-BSEC-21  CFE v2.1.21 (CFE core v2.1, BSP_REV 21), Endian Mode: Little
Build Date: Tue Dec  8 14:06:29 EST 2009 (christj@stb-mhtb-04)
Copyright (C) Broadcom Corporation.


DDR                        : Bank0:256MB@400MHz | Bank1:256MB@400MHz
NAND Boot                  : FlashSize 1024MB on CS0, BlkSize 256KB, PgSize 4096B
NAND vendor timing         : ecd310a6 SAMSUNG K9F8G08U0M SLC  t1(4353523b) t2(80000b78)

Macrovision is enabled
Running with first stage BSECK

Display splash screen
Using valid user input parameters - Resolution 576p on Component
[ Default Video ] :  Current Video Output : Component @ Resolution : 576p
Loading PAL SD image to 0x0f646c00 size 829440 bytes
Reading flash0.splash to V:0xaf646c00 from offset 4838400 len 829440
Done displaying splash screen
Reading flash0.splash to V:0xafe00000 from offset 5667840 len 44
done....Loader:elf Filesys:raw Dev:flash0.kernel File: Options:root=/dev/romblock12 ro rootfstype=squashfs videotype=PAL
Loading: 0x80008000/4321824 0x80427220/1309216
Successfully loaded secure elf image....
Entry address is 0x802def10
Starting program at 0x802def10
Well I didn’t manage to have console interaction with this, I can see output but any key pressed give no result (I also tried CTRL+C). Maybe I missed something ?
I looked for documentation on Internet and found exactly what I needed : the Blu-ray HR500 Service Manual. This documentation show everything I need to know where to plug and how.
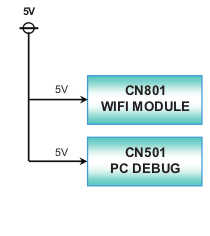
For example we can retrieve information about our CN501 component : it is the PC Debug UART interface of the chipset BCM7601, operating at 5V (weird, we measured 3.3V…).
Second try
Doing my best at RFTM, I can observe another debug interface operating at 3.3V : the component CN601

Ok, missed it but it’s located near the hard disk and it doesn’t look like an usual UART interface right ?
Here is the way I plugged each of my wires, it’s pretty ugly but it works :-)
| Single wire | All pieces together |
|---|---|
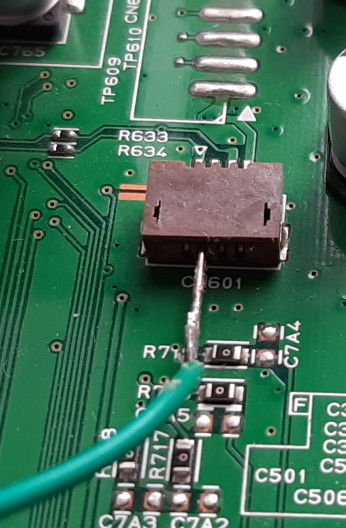 |
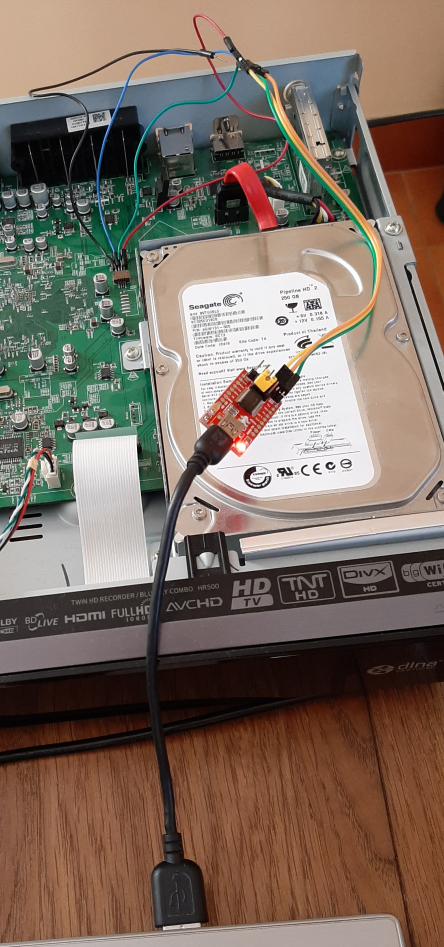 |
This setup gave a lot of output, here is the boot start logs :
52850 2wa8it0 waiA
REALTEK ROM Monitor, Revision 0011.0202.0024.
Copyright (c) Realtek Semiconductor Corp. - All Rights Reserved.

For a list of available commands, type 'help'.

Compilation time /version=      Nov  2 2009  10:08:30  /0011.0202.0024
MAC address =                   00.11.22.33.44.55
Processor Company ID/options =  0x01 (MIPS Technologies, Inc.) / 0x00
Processor ID/revision =         0x93 / 0x78
Endianness =                    Little
Flash memory size =             16 MByte
SDRAM size =                    256 MByte
First free SDRAM address =      0x800fc000

Press 'ESC' to Monitor mode
OS kernel in FLASH 0xbed00120 , to 0xa1000000, size=0xee482
PAL logo
OS kernel in memory 0xa1000000, to 0xa0100000, size=0xee482
lzma finished
OS kernel in FLASH 0xbedee5a2, to 0x81b00000, size=0xba151
lzma finished
OS kernel in FLASH 0xbeea86f3, to 0x81d80000, size=0xa1a01
lzma finished
5280Go 5280Go BolardBonding  0xi00008n280u
x param = go 803bc000 rootfstype=squashfs root=31:01 mtdparts=
go 80100000 rootfstype=squashfs root=31:01 mtdparts=VenusSFC:3236k,10844k,1024k,1280k
Reset Ethernet Mac.


Address = 0x80100000

Realtek LINUX (DC ALIAS) started...
Venus setting:
	ROSs have 2621440 bytes RAM.
	System CPU has 2 UARTs.
	System CPU uses external timer interrupt.
	Bootloader version: 0011.0202.0024. This version string is of new format.
	The information of this board: Company ID:0x11    CPU ID: 0x12    Board ID: 0x110202
	Ethernet Mac address: 00.11.22.33.44.55
	Model Config length=10
Config serial console: console=ttyS0,115200n8r
prom_flashsize = 0x01000000

audio addr: 1b00000
CPU revision is: 00019378
Determined physical RAM map:
 memory: 00100000 @ 00000000 (usable)
 memory: 003f2000 @ 00100000 (reserved)
 memory: 0160e000 @ 004f2000 (usable)
 memory: 00500000 @ 01b00000 (reserved)
 memory: 0e000000 @ 02000000 (usable)
  show info: max_low_pfn:65536
  show info: min_low_pfn:1266
<7>On node 0 totalpages: 65536
ZONE: DMA, PFN: 0
ZONE: Normal, PFN: 32768
ZONE: DVR, PFN: 4096
Built 1 zonelists
Kernel command line: rootfstype=squashfs root=31:01 mtdparts=VenusSFC:3236k,10844k,1024k,1280k console=ttyS0,115200n8r ip=192.168.0.3::192.168.0.1:255.255.255.0:::
Primary instruction cache 32kB, physically tagged, 4-way, linesize 32 bytes.
Primary data cache 32kB, 4-way, linesize 32 bytes.
[ SNIP]
Get a shell
After the prompt you only have to hit enter and yes, you’re root :-) The extract below shows processes that are running on the Blueray :
/ # ps aux
  PID  Uid     VmSize Stat Command
    1 root        364 S   init
    2 root            SWN [ksoftirqd/0]
    3 root            SW< [events/0]
    4 root            SW< [khelper]
    5 root            SW< [kthread]
    6 root            SW< [kblockd/0]
    7 root            SW  [khubd]
    8 root            SW  [pdflush]
    9 root            SW  [pdflush]
   11 root            SW< [aio/0]
   10 root            SW  [kswapd0]
   12 root            SW< [cifsoplockd]
   13 root            SW< [cifsdnotifyd]
   14 root            SW  [eth0]
   15 root            SW  [mtdblockd]
   27 root        524 S   -sh
   28 root        368 S   init
   29 root        368 S   init
   32 root        368 S   init
   37 root            SWN [jffs2_gcd_mtd2]
   62 root        384 S   inetd
   66 root            SW< [sata_eh/0]
   77 root            SW  [scsi_eh_0]
   79 root            SW  [scsi_eh_1]
   80 root        176 S   ./RootApp DvdPlayer
   81 root        176 S   ./RootApp DvdPlayer
   87 root       5084 R   DvdPlayer -s power
   89 root        176 S   ./RootApp DvdPlayer
   97 root       5084 S   DvdPlayer -s power
   98 root       5084 S N DvdPlayer -s power
   99 root       5084 S N DvdPlayer -s power
  109 root       5084 S   DvdPlayer -s power
  110 root       5084 S   DvdPlayer -s power
  112 root       5084 S   DvdPlayer -s power
  113 root       5084 S   DvdPlayer -s power
  114 root       5084 S   DvdPlayer -s power
  115 root       5084 S   DvdPlayer -s power
  119 root       5084 S   DvdPlayer -s power
  120 root       5084 S   DvdPlayer -s power
  121 root       5084 S   DvdPlayer -s power
  122 root       5084 S   DvdPlayer -s power
  123 root       5084 S   DvdPlayer -s power
  124 root       5084 S   DvdPlayer -s power
  136 root       5084 S   DvdPlayer -s power
  148 root       5084 R N DvdPlayer -s power
  181 root       5084 S   DvdPlayer -s power
  182 root       5084 S   DvdPlayer -s power
  183 root       5084 S   DvdPlayer -s power
  189 root       5084 S   DvdPlayer -s power
  197 root       5084 S   DvdPlayer -s power
  232 root       5084 S   DvdPlayer -s power
  235 root       5084 S   DvdPlayer -s power
  236 root       5084 S   DvdPlayer -s power
  237 root       5084 S   DvdPlayer -s power
  238 root       5084 S   DvdPlayer -s power
  239 root       5084 S   DvdPlayer -s power
  240 root       5084 S   DvdPlayer -s power
  277 root            SW  [kjournald]
  396 root        408 S   inetd
  398 root        356 R   ps
/ #
Step 3 - Get the firmware & the root filesystem
I didn’t investigate a lot in this part but here are some notes. The firmware updates are available here and two files are available for download :
$ ls
HR500_130612_0133.zip  LG_HR_500SB.zip
First file : LG_HR_500SB.zip
When unzipping the file, we get a ROM file. This ROM contains several files in it, as shown below.
$ unzip LG_HR_500SB.zip
Archive:  LG_HR_500SB.zip
  inflating: LG_HR_500SB.ROM

$ binwalk --signature -t LG_HR_500SB.ROM

DECIMAL       HEXADECIMAL     DESCRIPTION
----------------------------------------------------------------------------------------------------------------------------------------------------------------------------------------------
4964530       0x4BC0B2        lrzip compressed data
8063931       0x7B0BBB        Uncompressed Adobe Flash SWF file, Version 2, File size (header included) 25211646
8905784       0x87E438        MySQL MISAM index file Version 11
36592122      0x22E59FA       MySQL ISAM compressed data file Version 3
We can extract files :
$ dd if=LG_HR_500SB.ROM of=manual_extract/file1 bs=1 skip=$((0x0)) count=$((0x4BC0B2-0x0))
4964530+0 enregistrements lus
4964530+0 enregistrements écrits
4964530 octets (5,0 MB, 4,7 MiB) copiés, 9,53205 s, 521 kB/s

$ dd if=LG_HR_500SB.ROM of=manual_extract/file2 bs=1 skip=$((0x4BC0B2)) count=$((0x7B0BBB-0x4BC0B2))
3099401+0 enregistrements lus
3099401+0 enregistrements écrits
3099401 octets (3,1 MB, 3,0 MiB) copiés, 6,00283 s, 516 kB/s

etc.
The file 1 seems to be our firmware. I didn’t investigate more into this path.
49 4E 56 49  4E 43 49 42  4C 45 5F 49  4D 41 47 45  01 02 20 00  00 00 00 00  42 44 2E 38  2E 30 38 2E  36 32 38 00
INVINCIBLE_IMAGE.. .....BD.8.08.628.....
Second file : HR500_130612_0133.zip
Opening the file leads to get the Bluray filesystem.
$ unzip HR500_130612_0133.zip
Archive:  HR500_130612_0133.zip
  inflating: HR500_130612_0133.img

$ file HR500_130612_0133.img
HR500_130612_0133.img: POSIX tar archive (GNU)

$ cp HR500_130612_0133.img HR500_130612_0133.img.tar

$ tar xf HR500_130612_0133.img.tar

$ ls -l | awk {'print $9'}

arial.ttf
configuration.xml
flash_erase
IMAGE_SWUG_BAR_1.bmp
IMAGE_SWUG_BAR_2.bmp
IMAGE_SWUG_BAR_3.bmp
IMAGE_SWUG_BAR_4.bmp
IMAGE_SWUG_BG.bmp
install_a
mkfs.jffs2
nandwrite
package1
video_firmware.install.bin
We can retrieve the same files we observe when having the root shell (cf. above chapter) so I didn’t investigate more into this path.
$ cd package1
$ tar xf usr.local.etc.tar.bz2
$ cat passwd
root:QMr4wI16DsEeA:0:0:root::/bin/sh
daemon:x:1:1:daemon:/usr/sbin:/bin/sh
bin:x:2:2:bin:/bin:/bin/sh
sys:x:3:3:sys:/dev:/bin/sh
sync:x:4:100:sync:/bin:/bin/sync
mail:x:8:8:mail:/var/spool/mail:/bin/sh
proxy:x:13:13:proxy:/bin:/bin/sh
www-data:x:0:0:www-data:/var/www:/bin/sh
backup:x:34:34:backup:/var/backups:/bin/sh
operator:x:37:37:Operator:/var:/bin/sh
sshd:x:103:99:Operator:/var:/bin/sh
nobody:QMr4wI16DsEeA:99:99:nobody:/:/bin/sh
default:QMr4wI16DsEeA:1000:1000:Default non-root user:/:/bin/sh
Outro
Well, that’s all for this time. I hope you enjoyed discovering hardware hacking and feel free to give me some feedback, it would be appreciated.
Skol !